

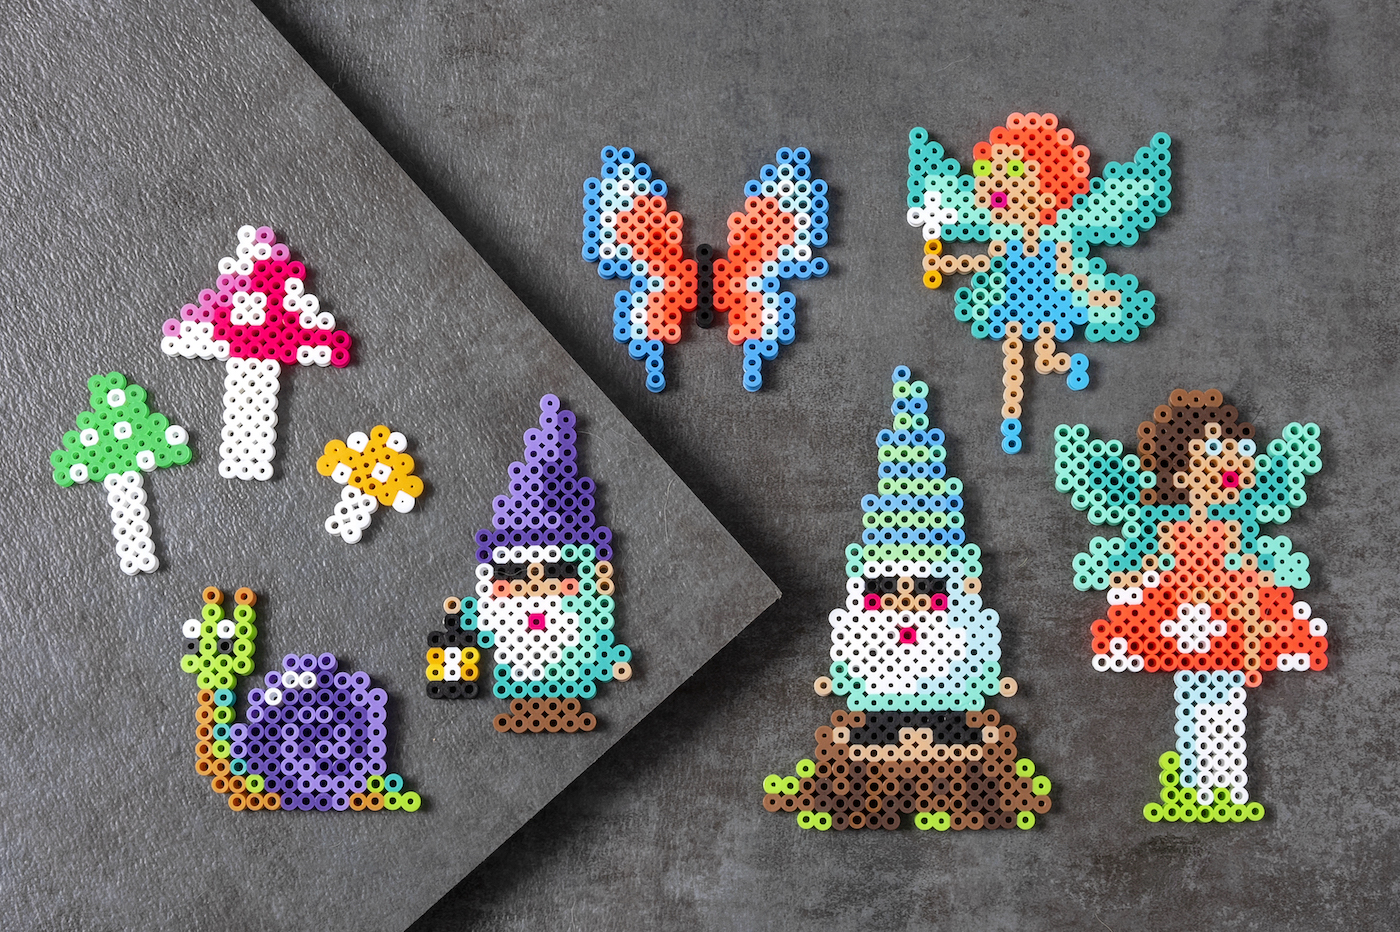
Learn how to make fairy and gnome perler beads perfect for spring or summer! Both kids and adults will enjoy these 25+ patterns.
If this is your first time here, I’ve got a spoiler alert for you: we love gnomes. Those mythical little creatures that live underground and protect treasures.
OR sit on our front stoop as a garden gnome.
I’m not sure if gnomes would appreciate being called “cute,” but they are. I’d imagine guardians of treasure would prefer being called “tough,” but I can’t say for sure.
I can say one thing for sure though. Well, two. One – not only do we love gnomes, but we love perler beads. And two? We have some great gnome perler beads to share with you today!
There are over 25 patterns that I know you’re going to love. They’re a super easy spring or summer craft if the kids get bored. Not that you can’t make them any time of year.
In fact, gnomes are popular around Christmas too! I think they might be hired to help deliver some packages? When there aren’t enough elves. That’s what I’ve heard, anyway!
Not only do you get perler patterns for gnomes, but you’ll also get fairies, animals, and mushrooms. Oh, and you definitely have to see our mushroom perler beads! There are some cute houses over there.
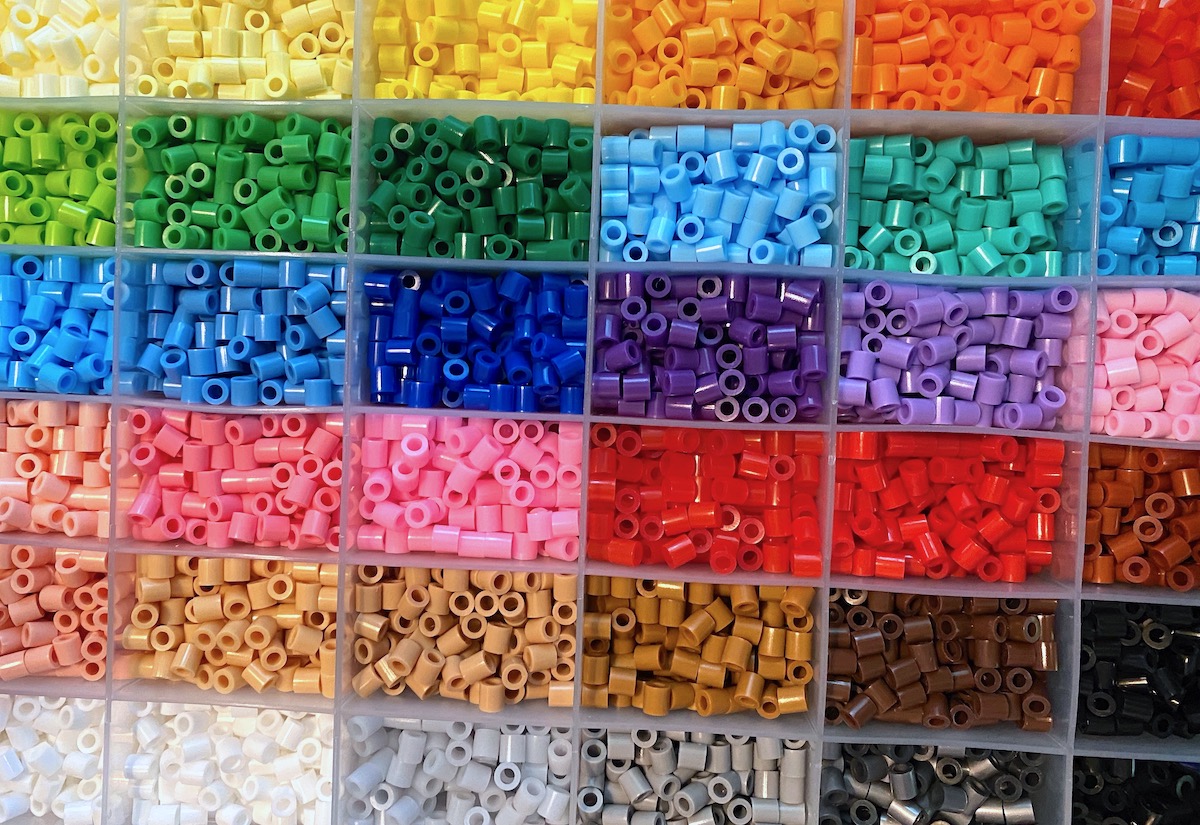
Perler beads are recommended for ages six and up, so this is a very fun craft to try with your elementary age kids (and up). All children seem to love perler beads (also known as hama beads, fuse beads, or melty beads). But don’t be shy – adults love them too!
Tips for Using Perler Beads
Before we get into the patterns, I want to review a few basics of using fuse beads to make sure you get the best results. If you don’t want the tips, scroll down to the bottom to get the gnome hama beads.
Remember that the overall goal is to melt the beads together on both sides while still leaving the holes open. Here’s how you get the best results.
Use Ironing or Parchment Paper
Place ironing paper or parchment paper over the beads on the pegboard. Be gentle so you don’t disturb the beads underneath.
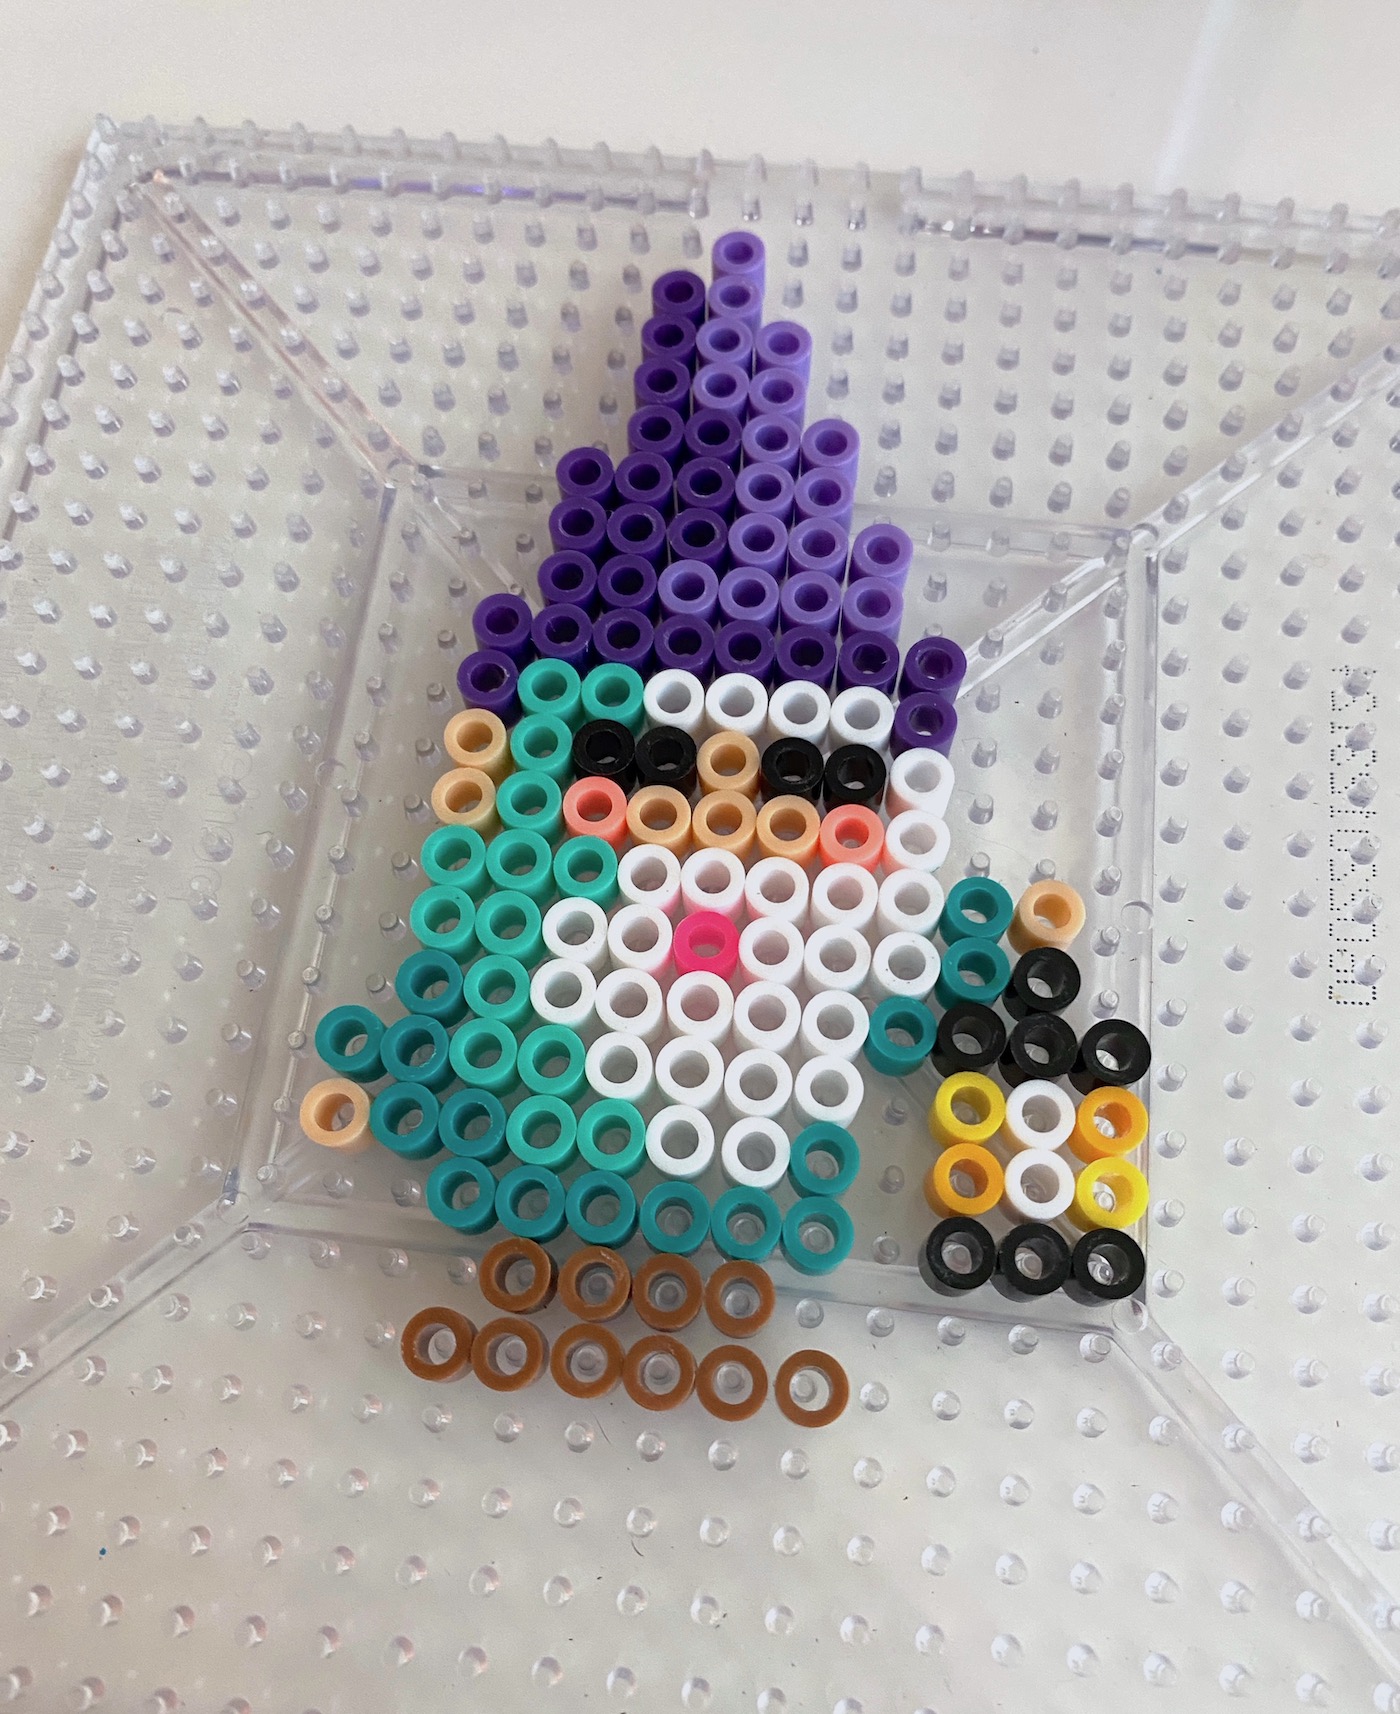
Heat your iron to the medium setting (no steam). In a circular motion, begin to iron the project. Don’t press down too hard with the iron. When ironed properly, the beads will still have an open center. Check and make sure your edges are melted. Let the design cool on the pegboard.
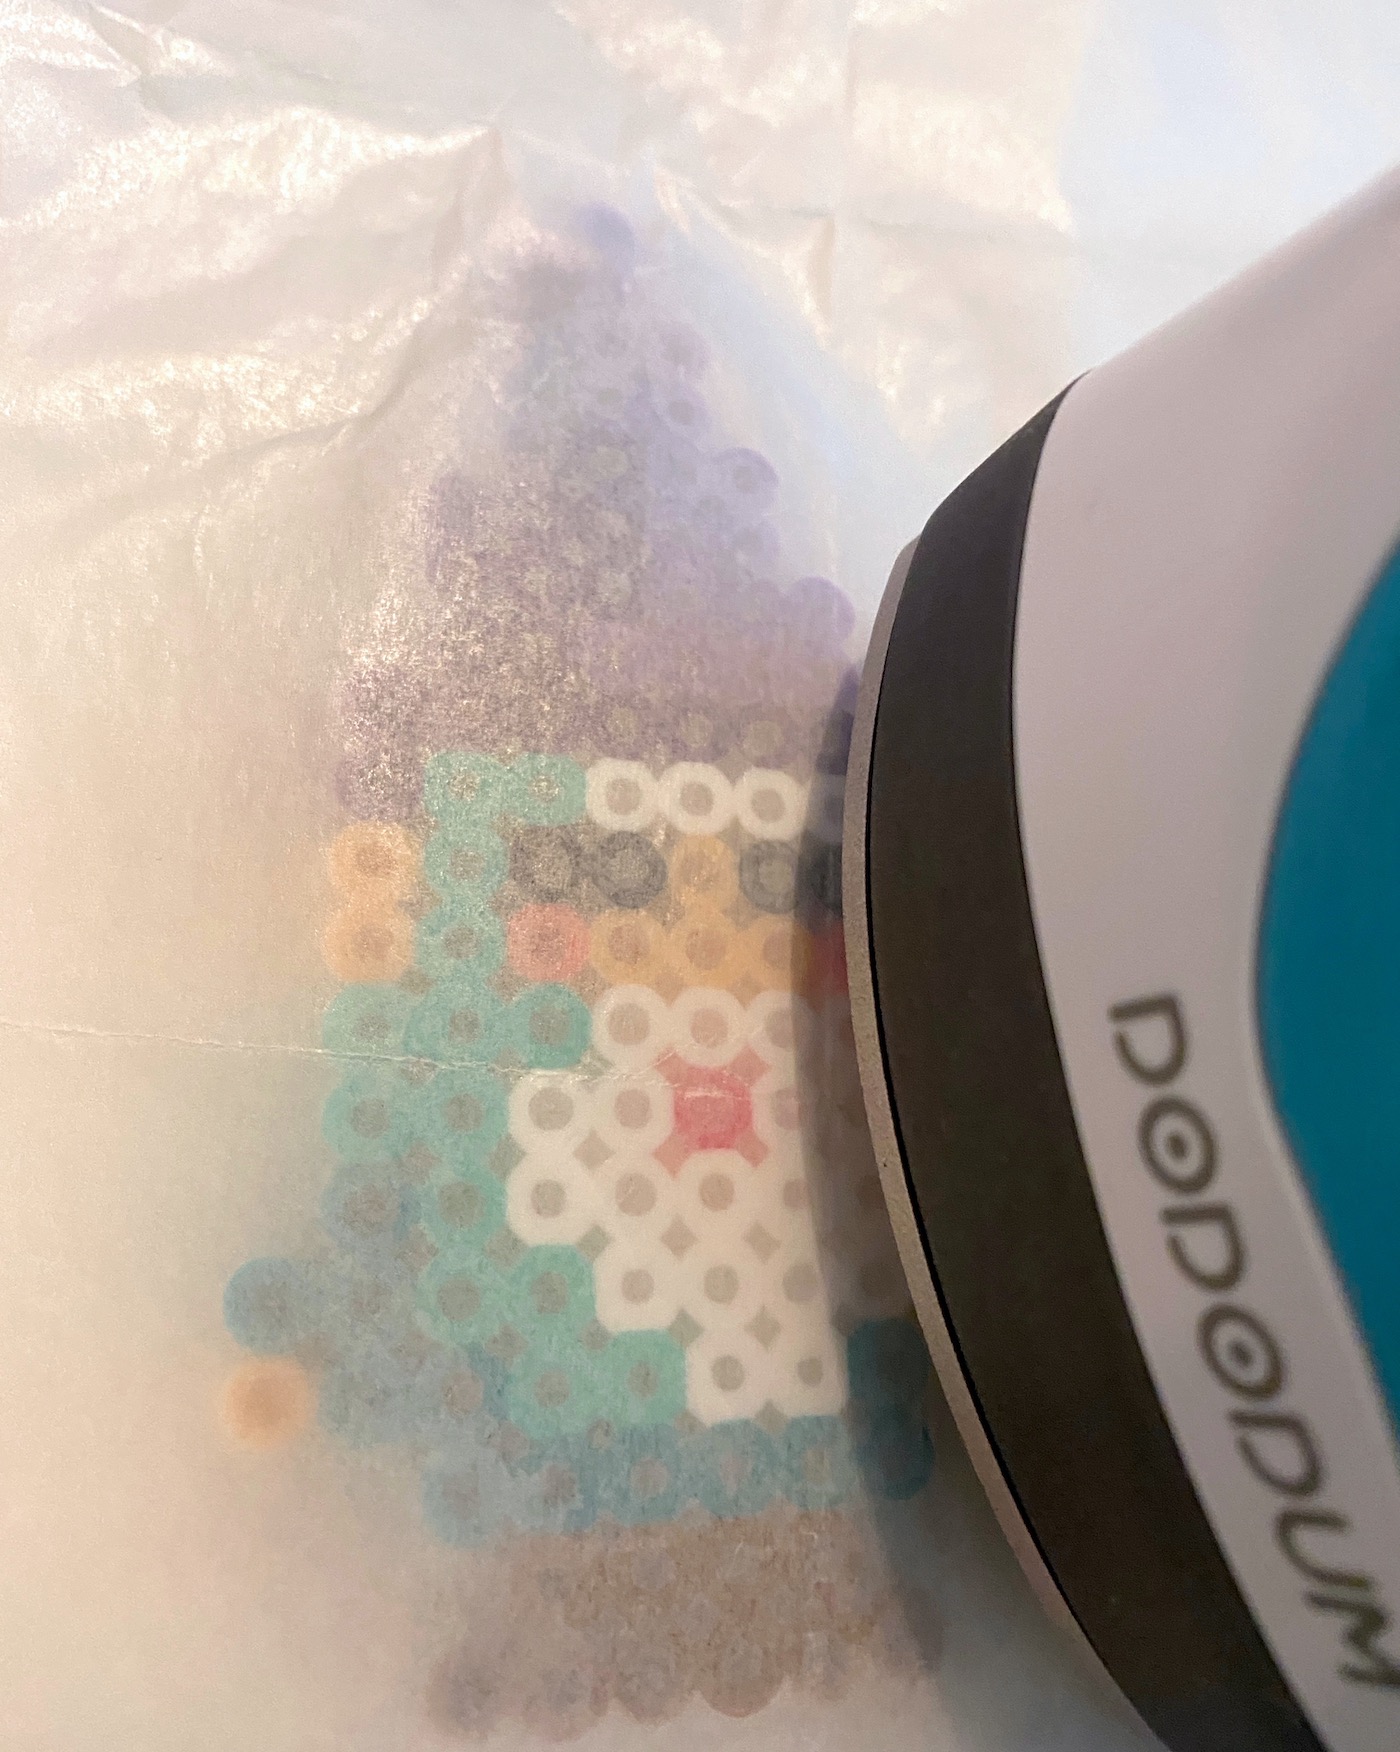
Note: BE CAREFUL about lifting up the paper while you’re ironing! If you want to check, carefully peel back paper around the edge of your design and see if all the beads are melted.
If you lift the paper up quickly and there are a lot of unmelted beads, they will easily fall off or go flying and you may be forced to start over. Sometimes the edges need more time so when you check, just check the edges and peel paper back slowly.
Another Note: some beads melt faster than others (clear melts faster than white, for example). So some holes might be larger than others. It’s okay! That’s part of the look of the project.
Iron the Other Side
Remove the bead design from the pegboard. Flip it over to the non-melted side and repeat the fusing process.
Remove the Paper
Let cool completely and remove the paper again (which is reusable). Some people pull the paper off after they iron the first side, but I just wait until the end and peel off both pieces. It’s up to you!
Are you ready to try the patterns? Check them below! Don’t forget, you can customize them with your own colors. You don’t have to do what I did. Happy crafting!
Gnome Hama Beads
Make sure to check out these notes:
- A few of these patterns are larger than a 29 x 29 pegboard, so you’ll either need a extra large pegboard (49 x 69 tall) or to put multiple square peg boards together to form a larger “canvas.”
- Some of these patterns use a round pegboard; you’ll definitely want in your arsenal just generally speaking.
- You’ll see a couple of the pattern backgrounds below aren’t white – that’s simply to give contrast so you can see where all the white beads should go. You don’t need to add the background (but you can if you want to).
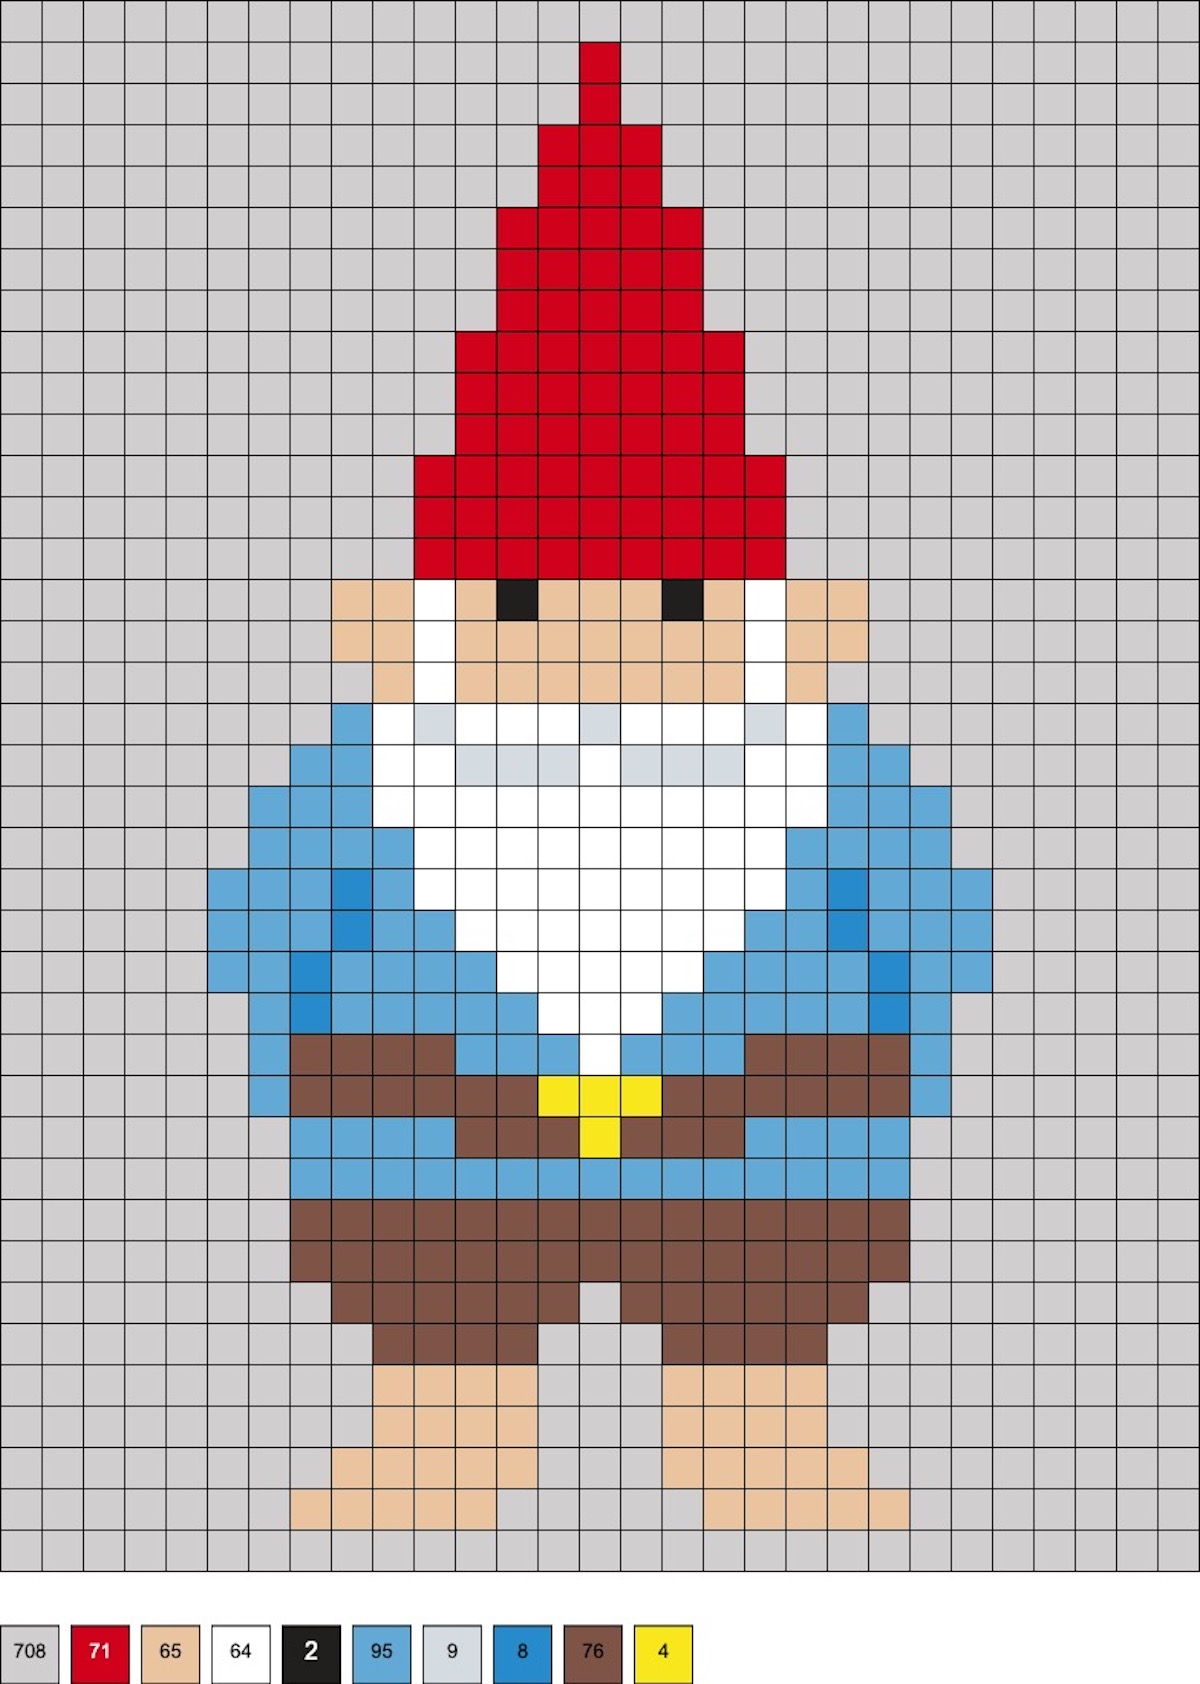
Standing Gnome with Red Hat
This pattern uses 71 red, 65 tan, 64 white, 2 black, 95 pastel blue, 9 light gray, 8 blue, 76 brown, and 4 yellow beads.
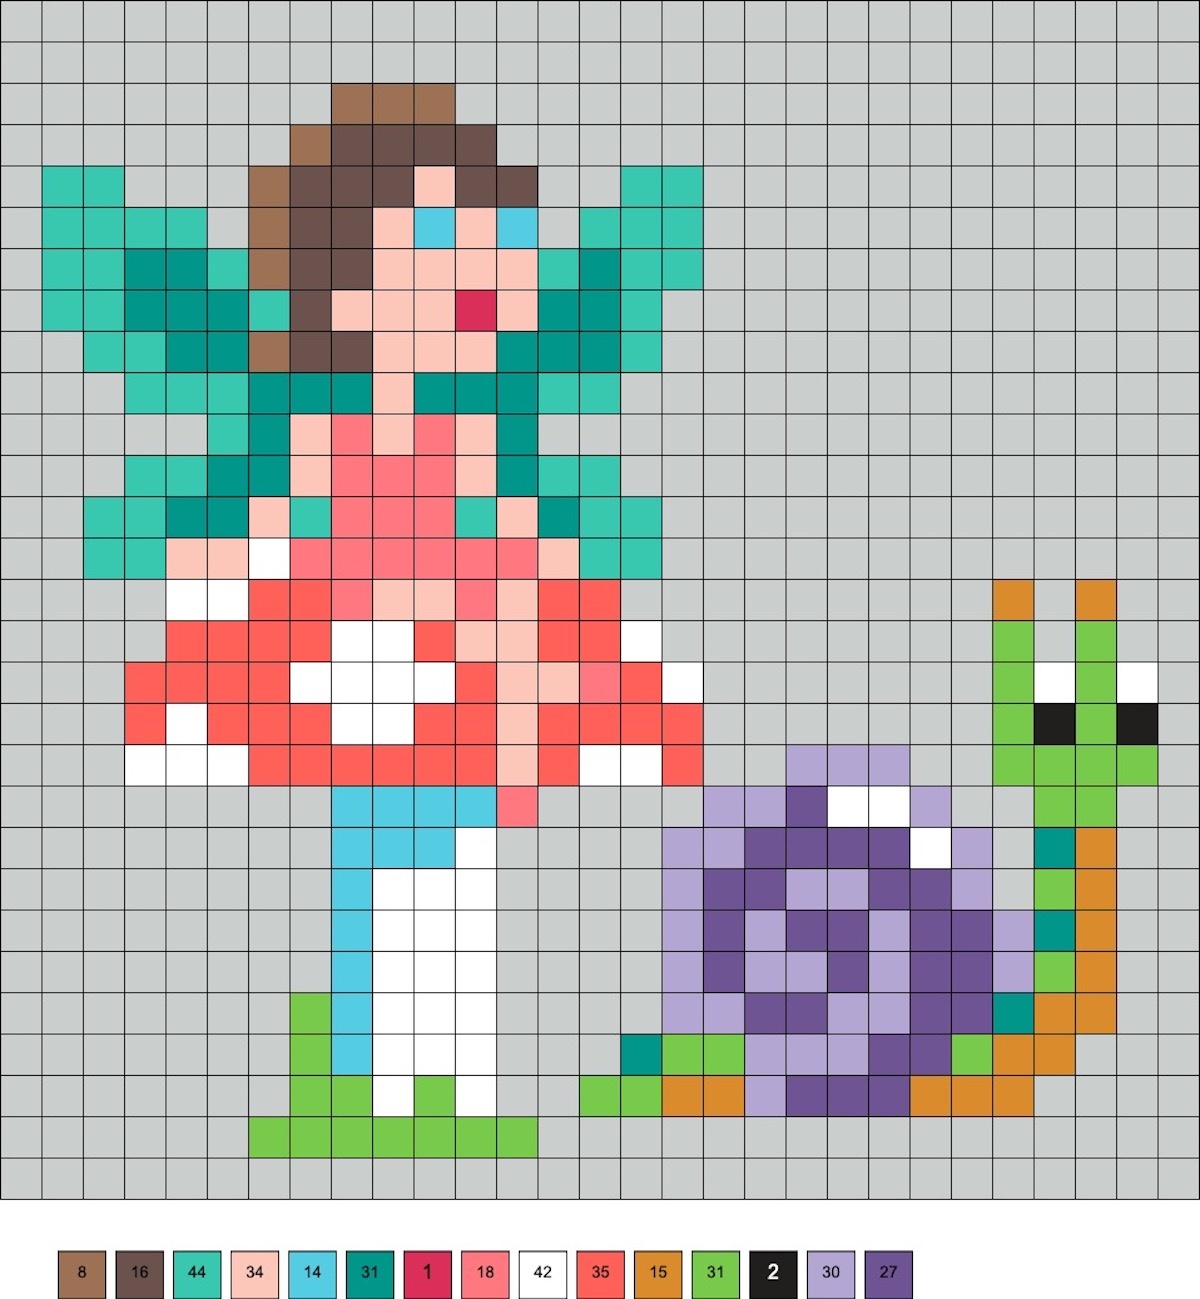
Fairy on a Mushroom and Snail
These patterns use 8 gingerbread, 16 brown, 44 light green, 34 flesh, 14 sky, 31 parrot green, 1 fruit punch, 18 salmon, 42 white, 35 hot coral, 15 honey, 31 kiwi green, 2 black, 30 light lavender, and 27 purple beads.
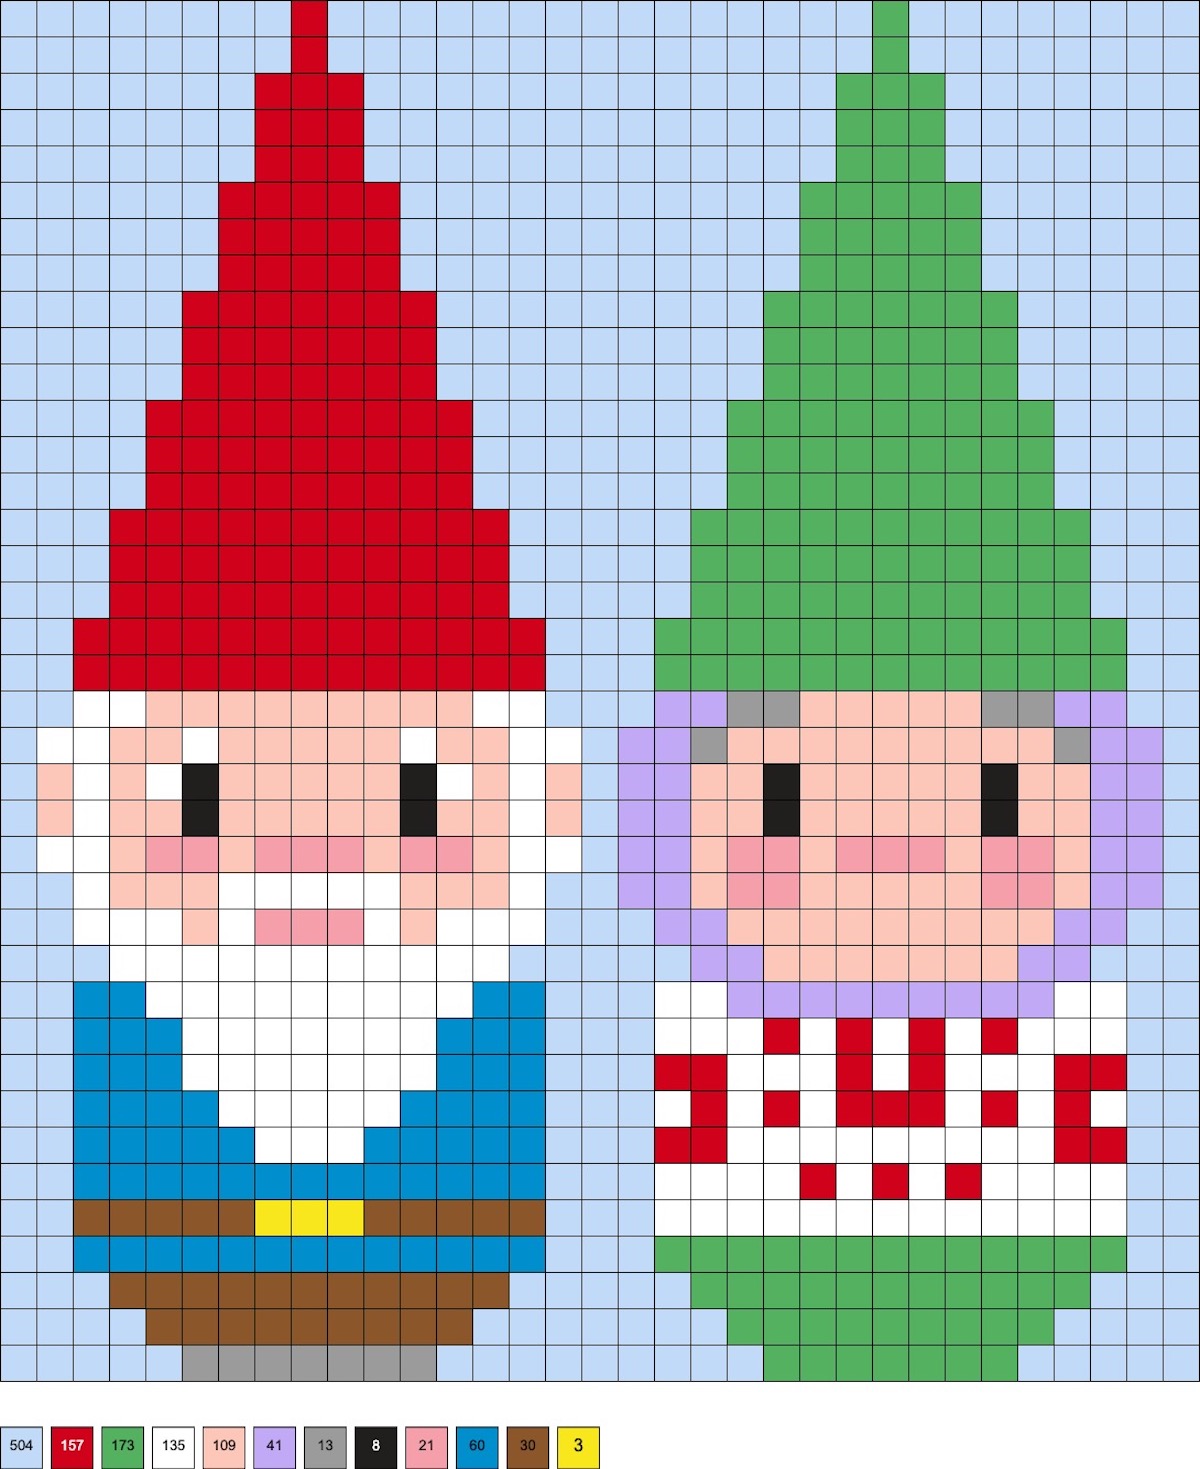
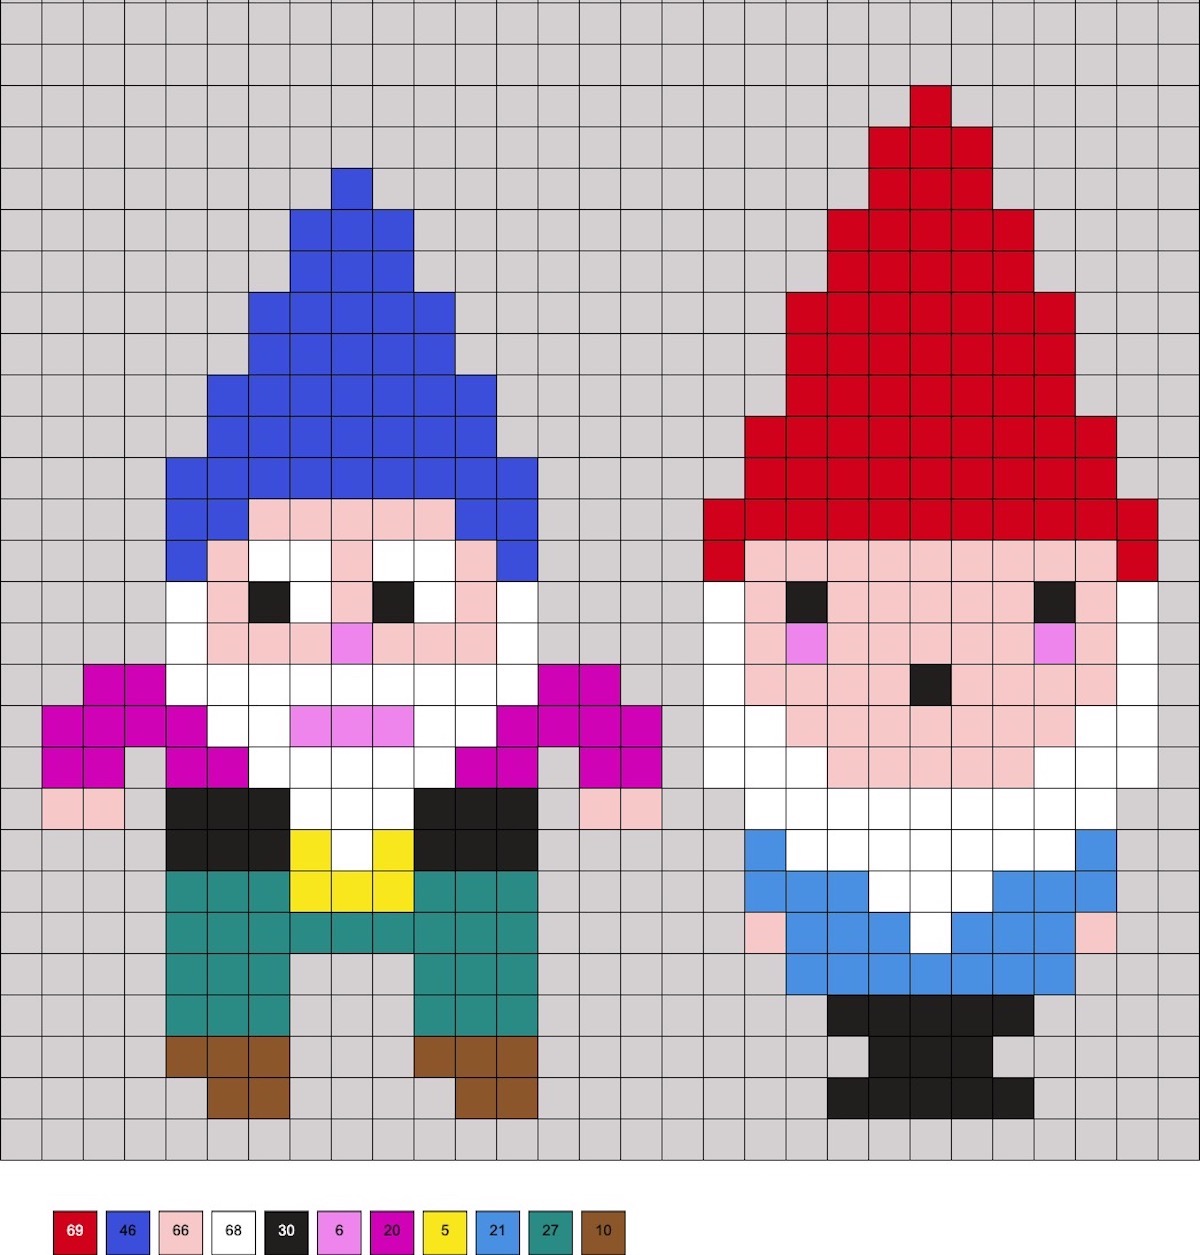
Man and Woman Gnomes
These patterns use 157 red, 173 green, 135 white, 109 flesh, 41 light lavender, 13 gray, 8 black, 21 pink, 60 blue, 30 brown, and 3 yellow beads.
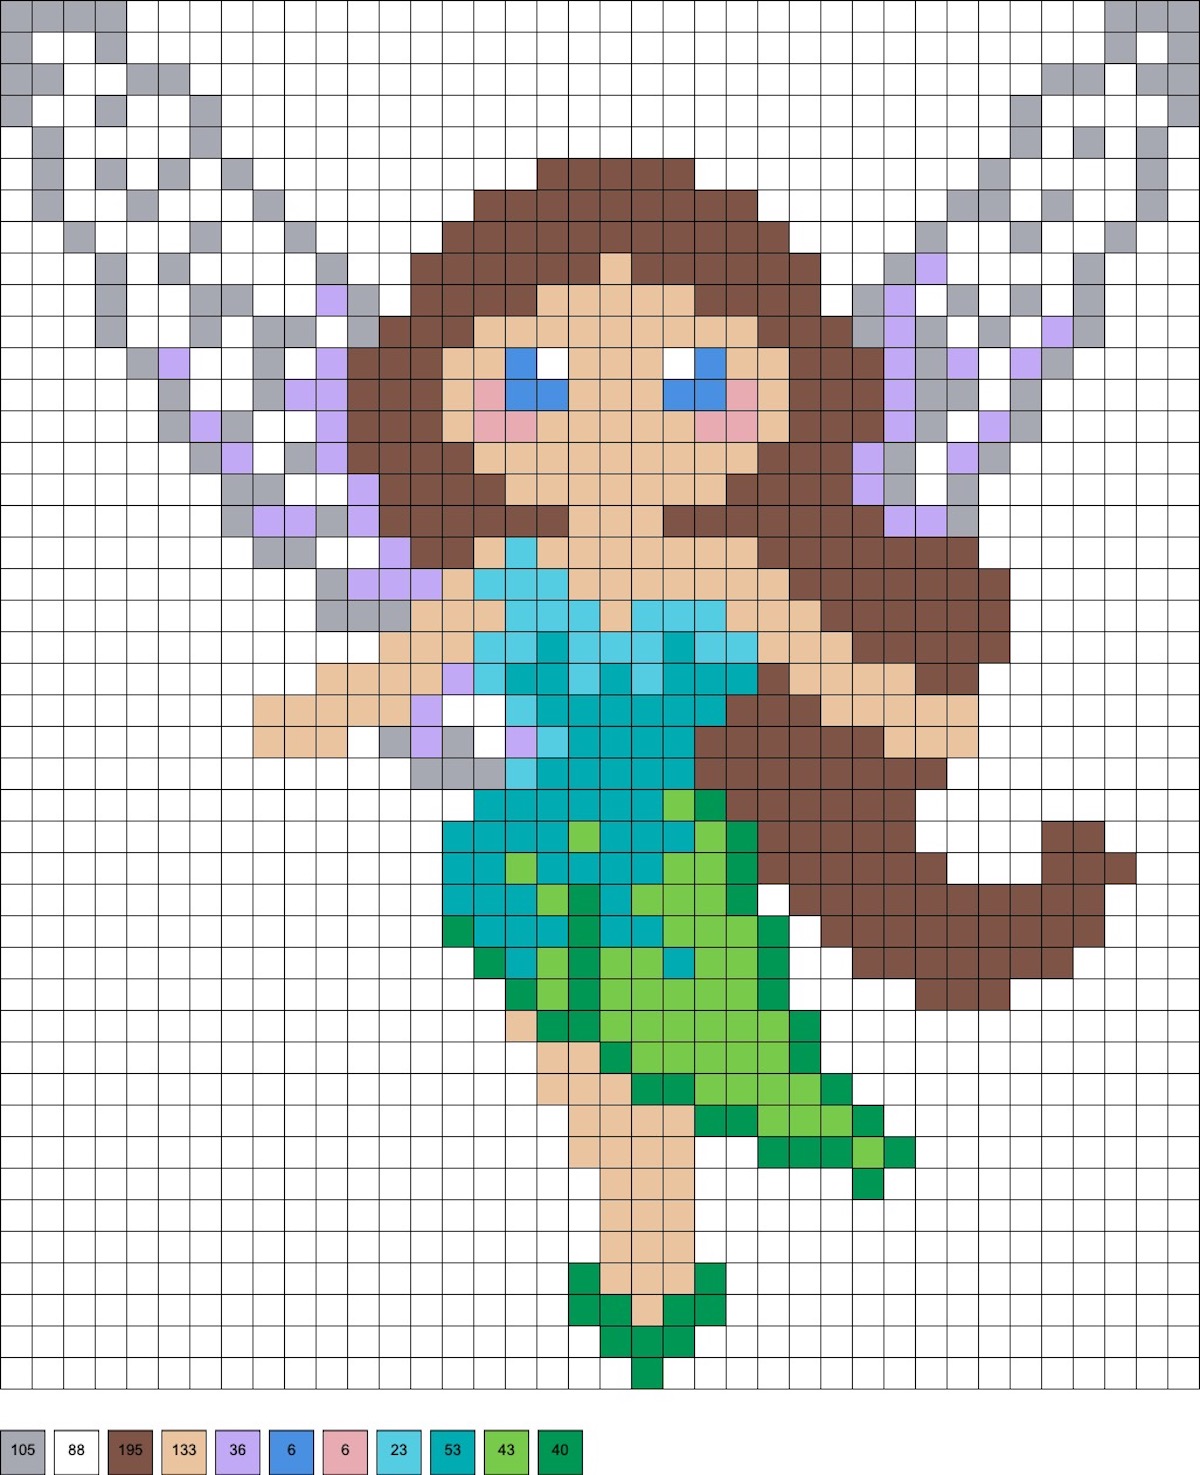
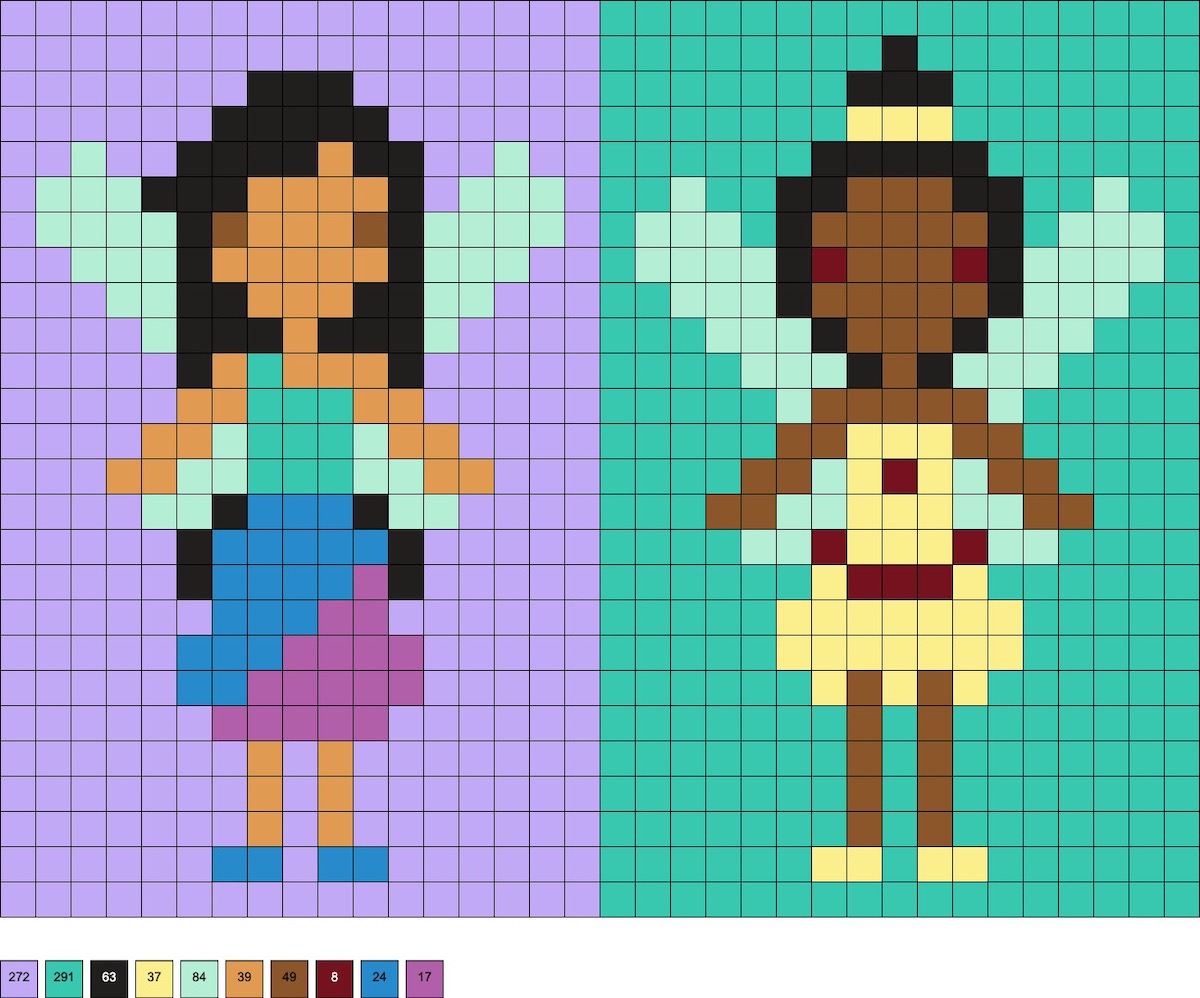
Large Fairy with Open Wings
This pattern uses 105 clear glitter, 88 white, 195 brown, 133 sand, 36 lavender, 6 blue, 6 pink, 23 sky, 53 turquoise, 43 kiwi green, and 40 bright green beads.
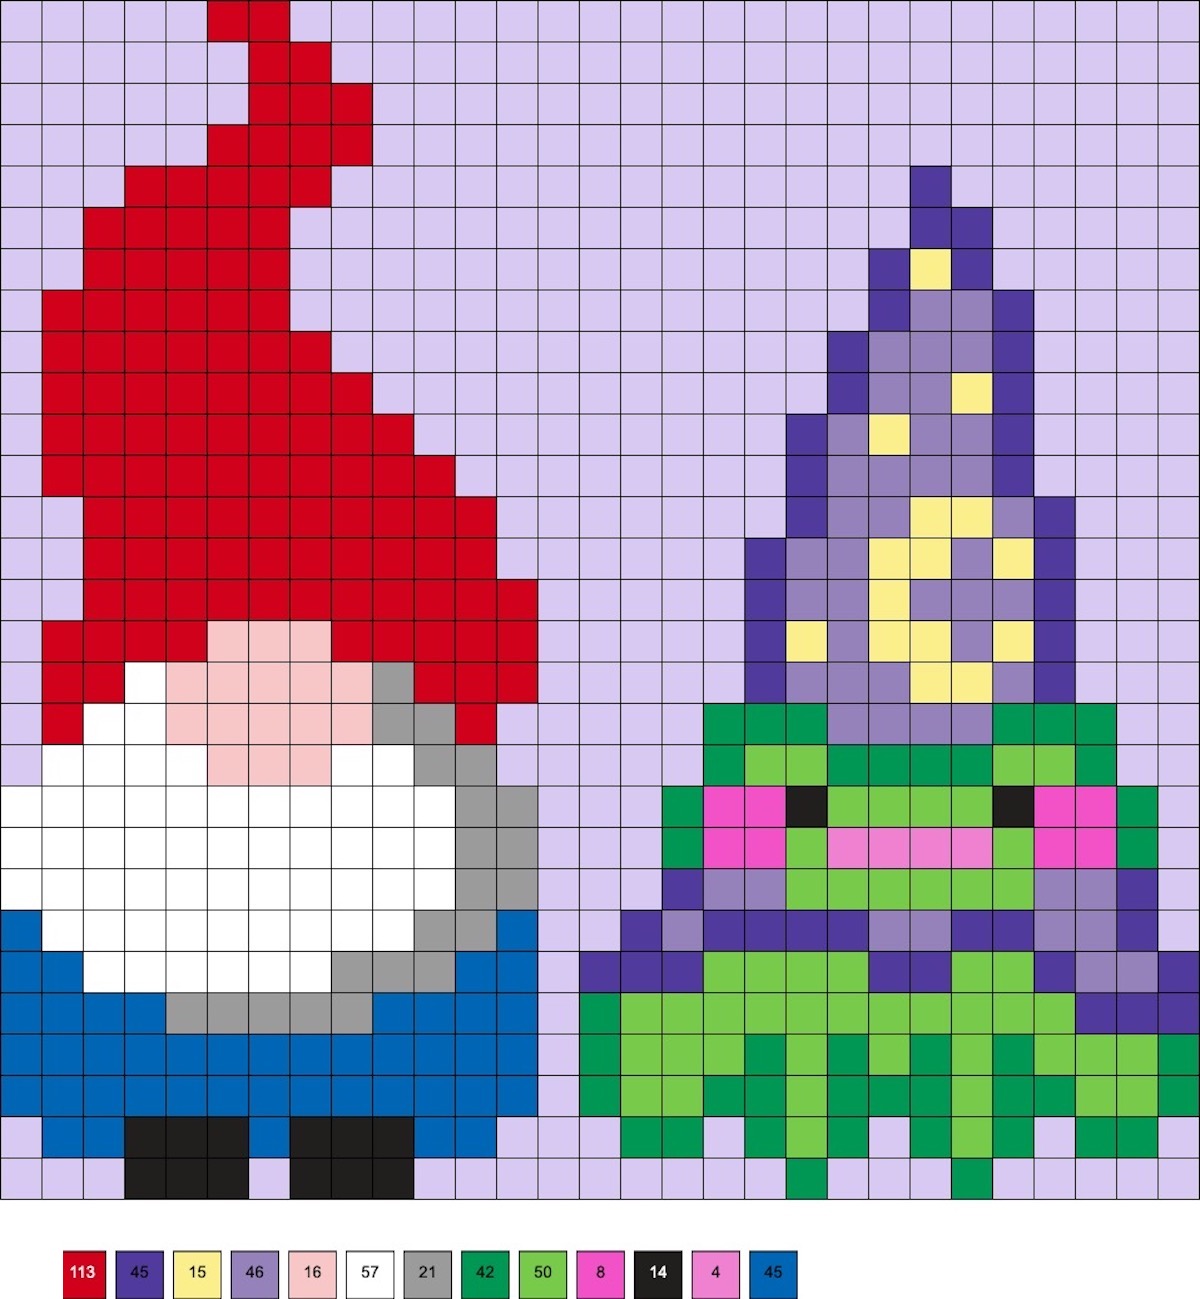
Gnome with Tall Hat and Magical Frog
These patterns 113 red, 45 grape, 15 pale yellow, 46 pastel lavender, 16 flesh, 57 white, 21 gray, 42 bright green, 50 kiwi green, 8 fuschia, 14 black, 4 pink, and 45 blue beads.
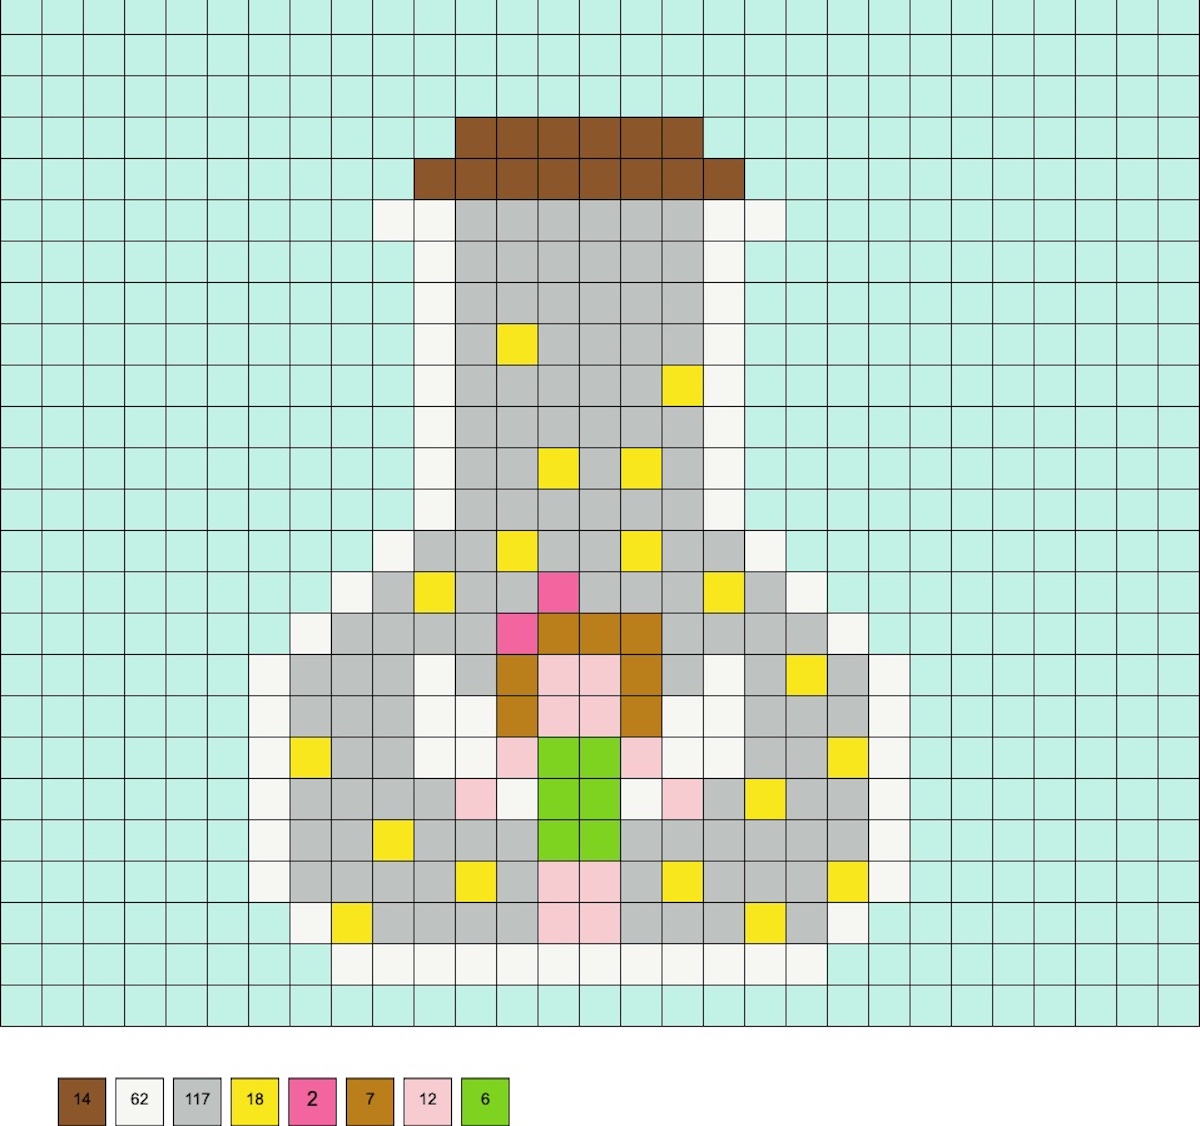
Fairy in a Bottle
This pattern uses 14 brown, 62 white, 117 clear, 18 yellow, 2 pink, 7 honey, 12 flesh, and 6 kiwi green beads.
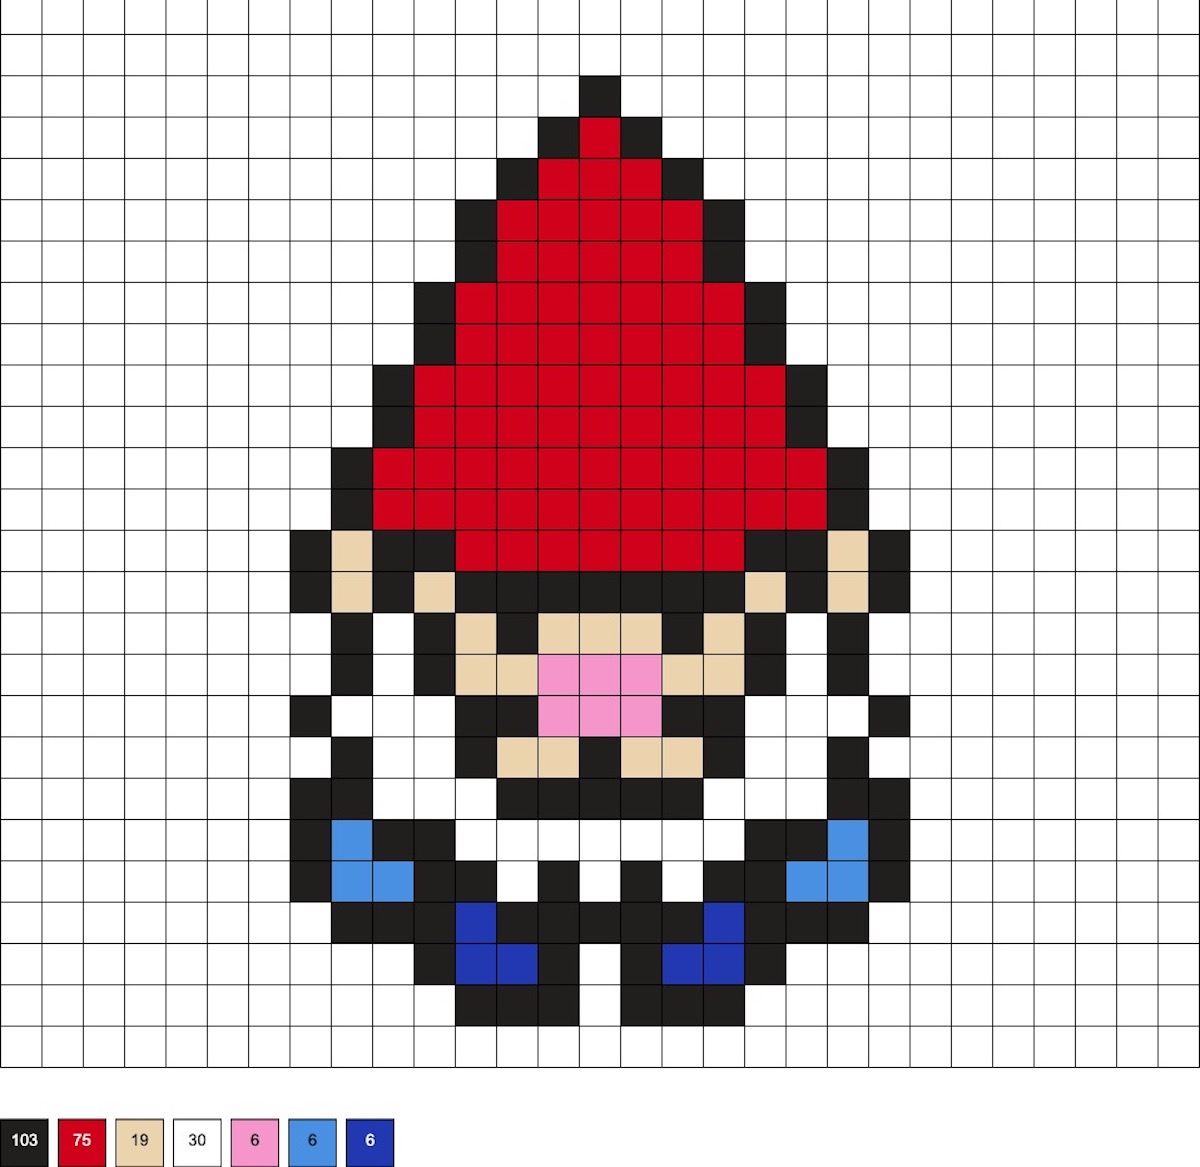
Pixel Gnome
This pattern uses 103 black, 75 red, 19 flesh, 30 white, 6 pink, 6 light blue, and 6 cobalt beads.
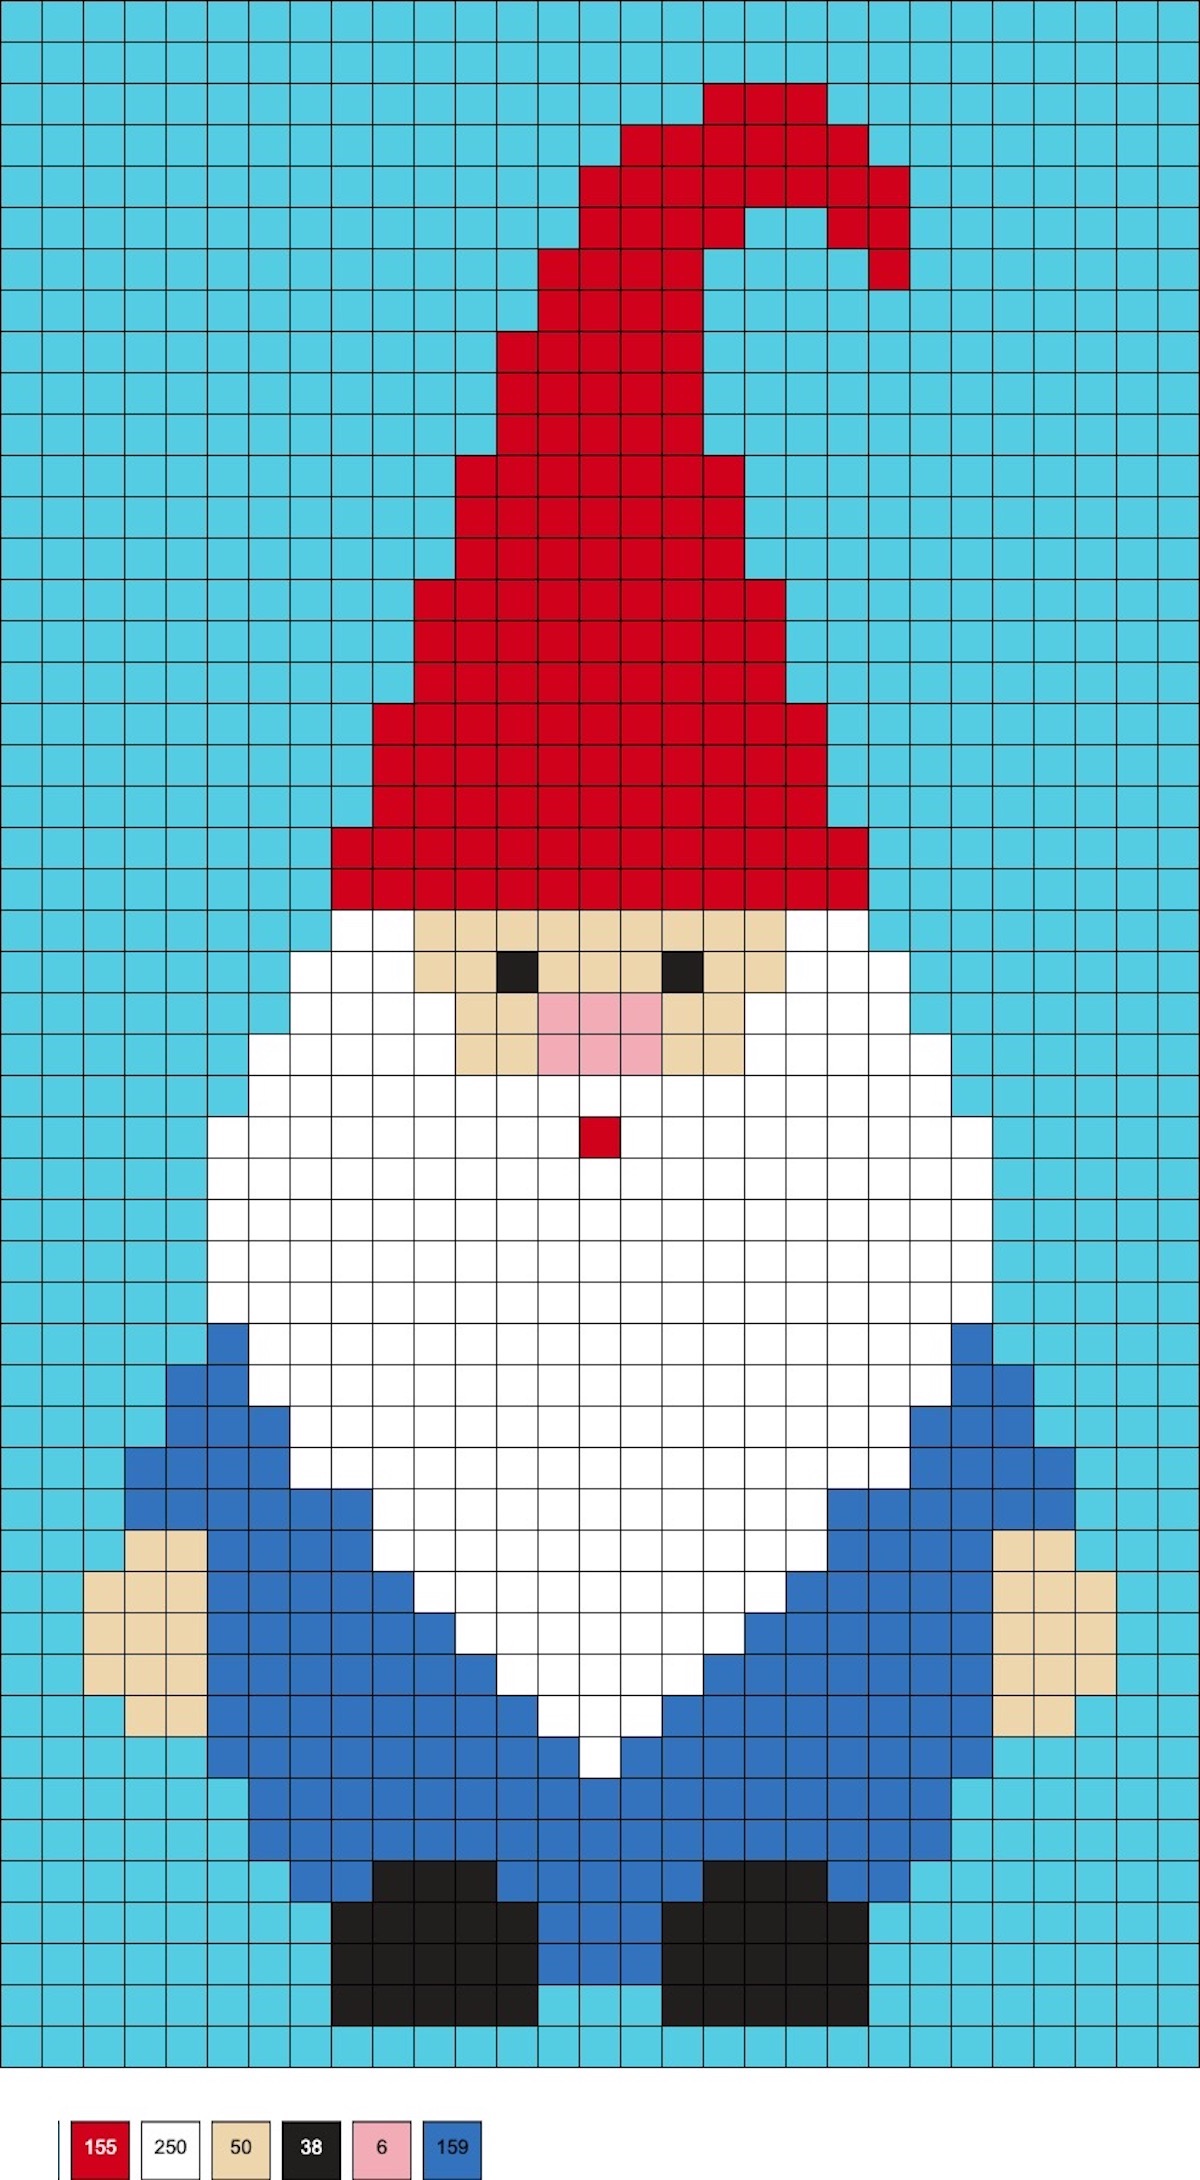
Pensive Gnome
This pattern uses 155 red, 250 white, 50 flesh, 38 black, 6 pink and 159 light blue beads.
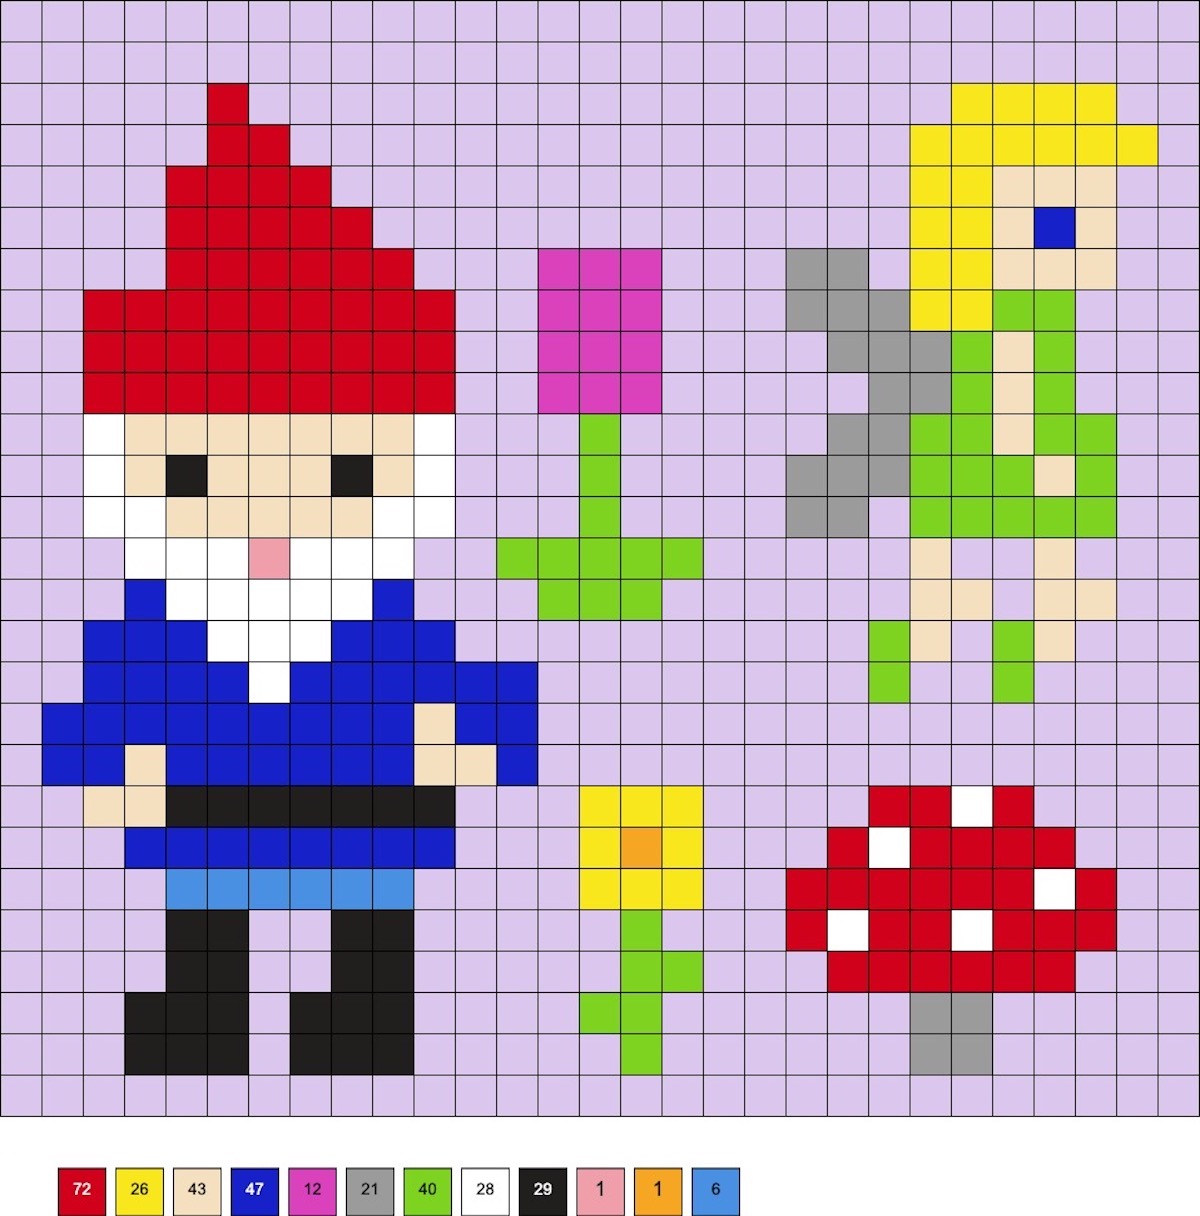
Mini Gnome, Flowers, and a Fairy
These patterns use a variety for colors and all fit on one 29 x 29 board.
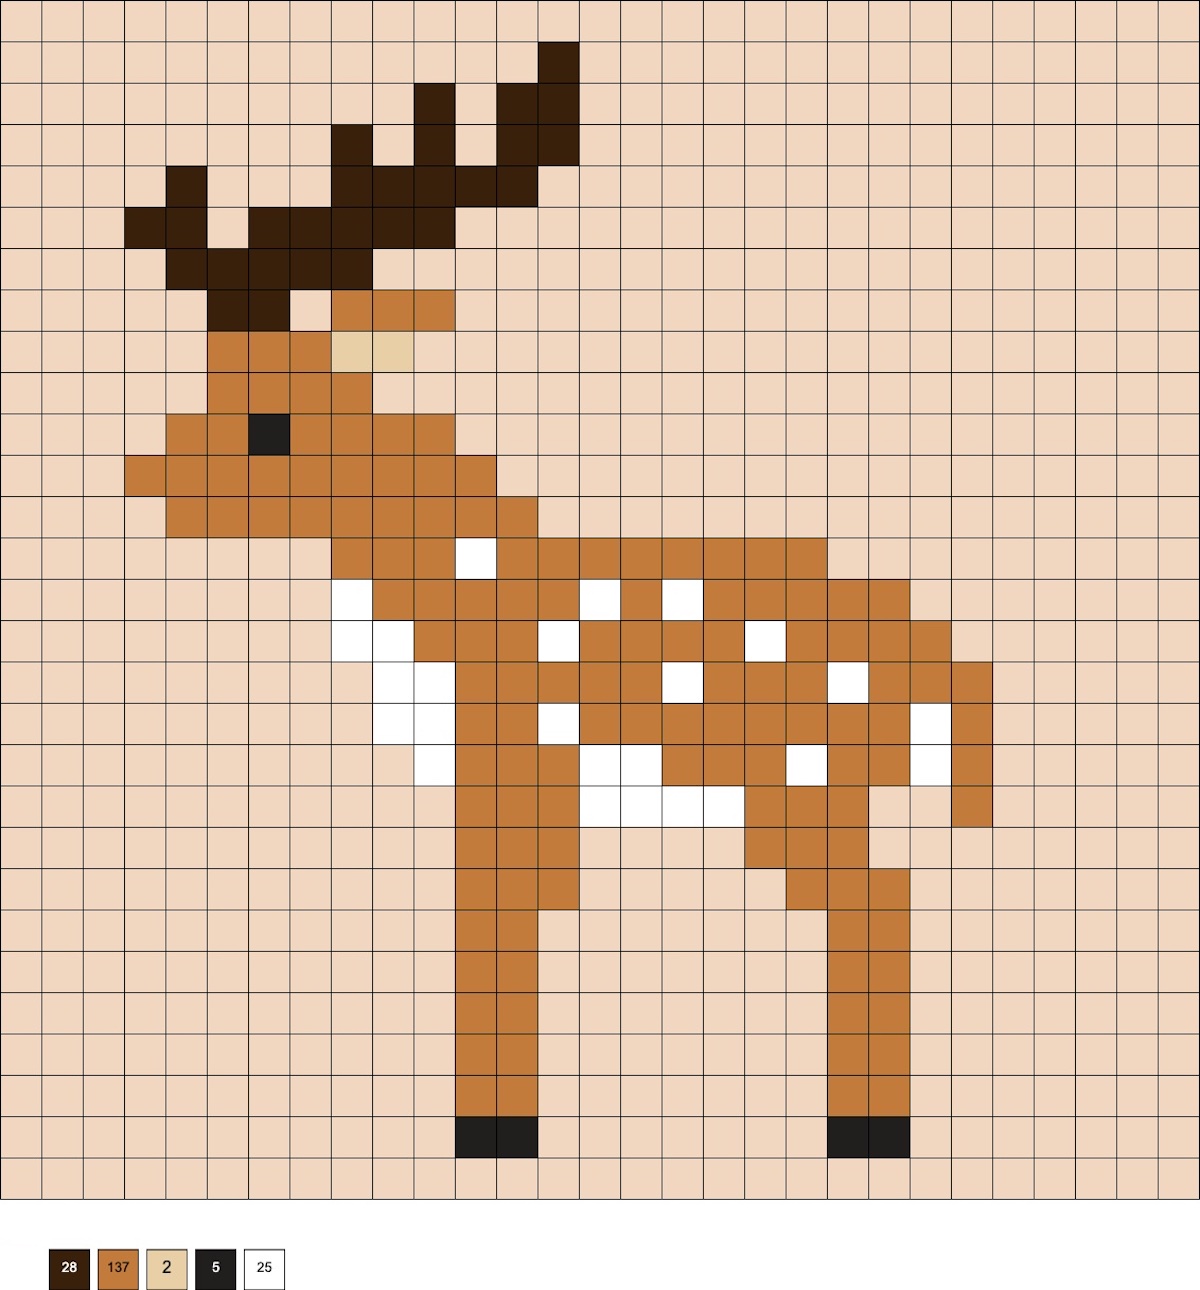
Standing Deer
If you’ve got gnomes and fairies you might need a deer to visit too! This pattern uses 28 dark brown, 137 gingerbread, 2 flesh, 5 black, and 25 white beads.
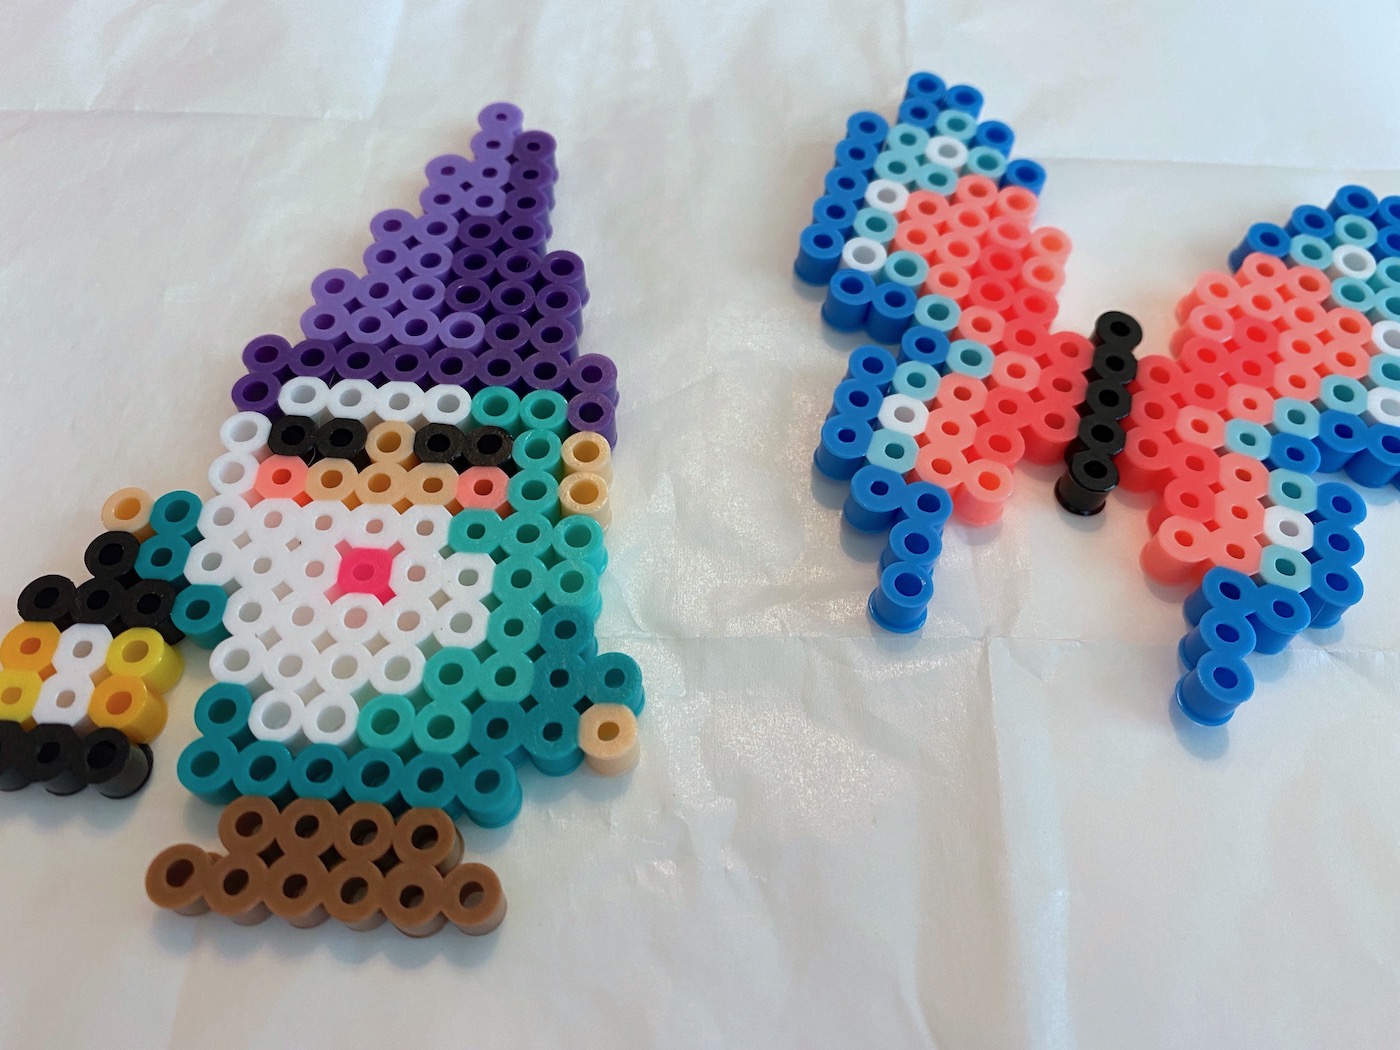
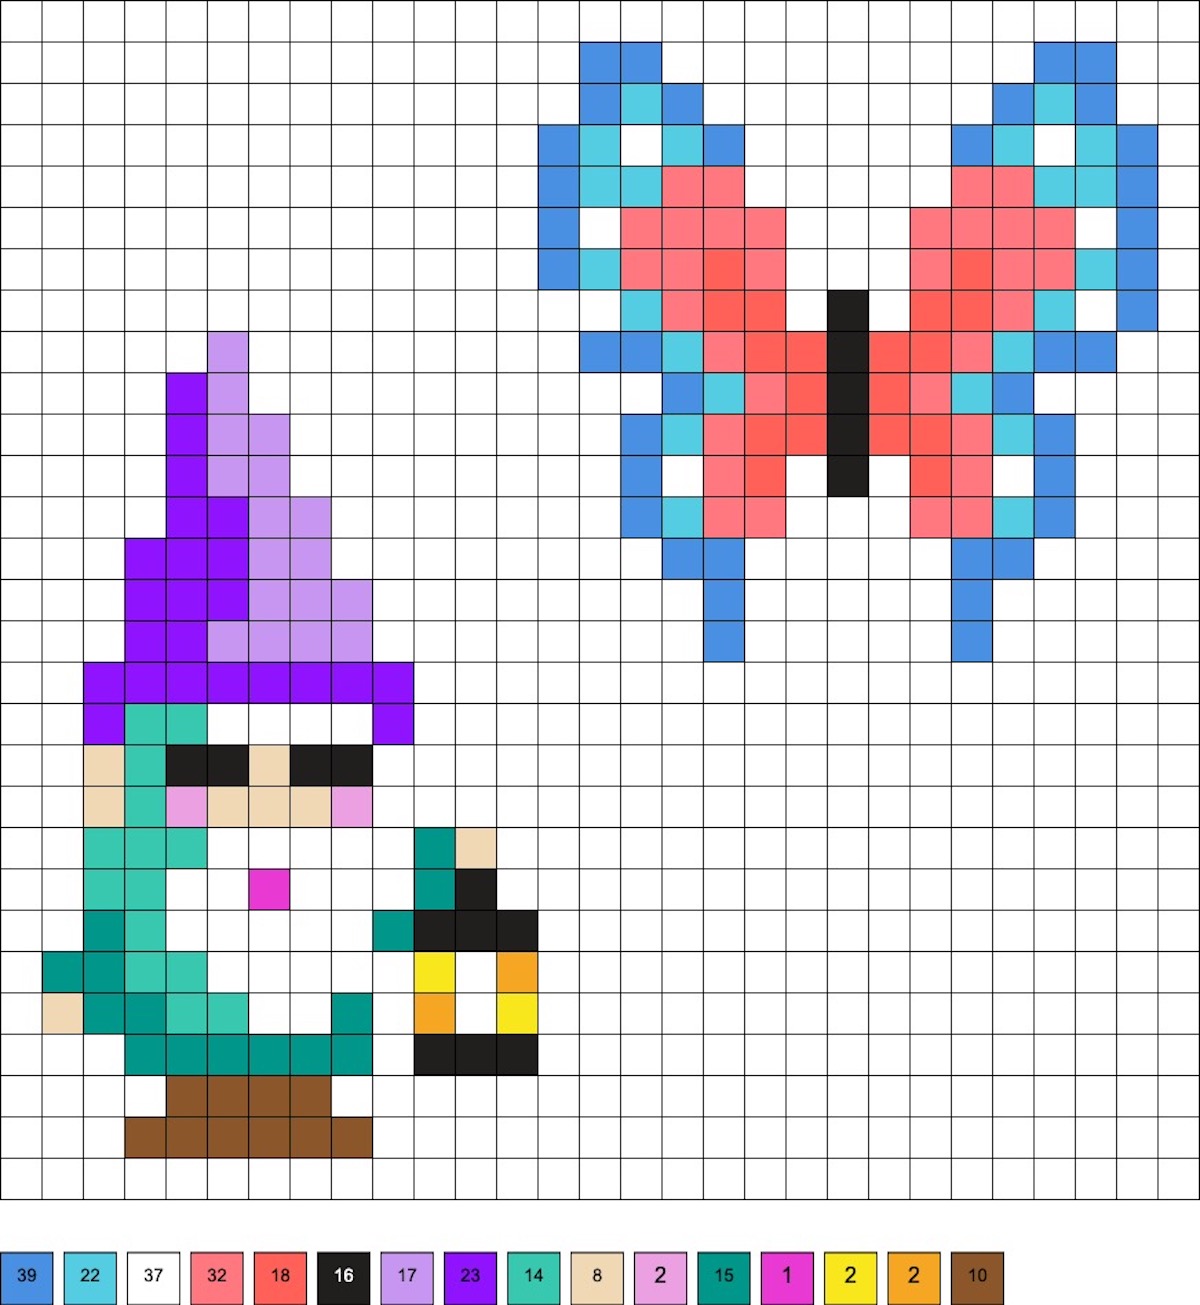
Gnome with a Lantern and a Butterfly
These patterns are a good opportunity to use a variety of extra colors because they don’t require that many beads of each!
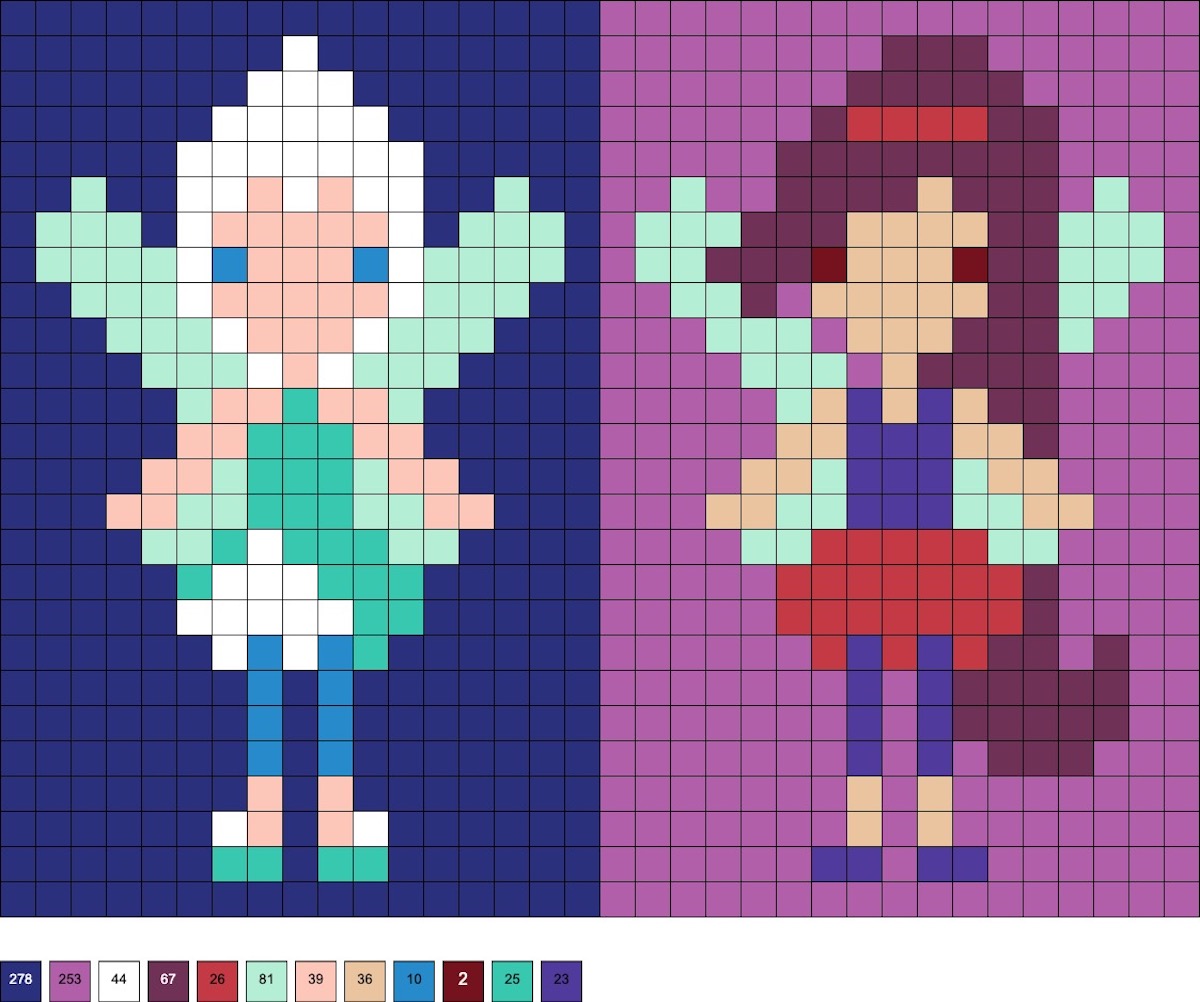
White Haired and Purple Haired Fairies
These cute fairies are fun with or without the background.
Small Standing Gnomes
These gnomes are great for customizing with any extra colors you have!
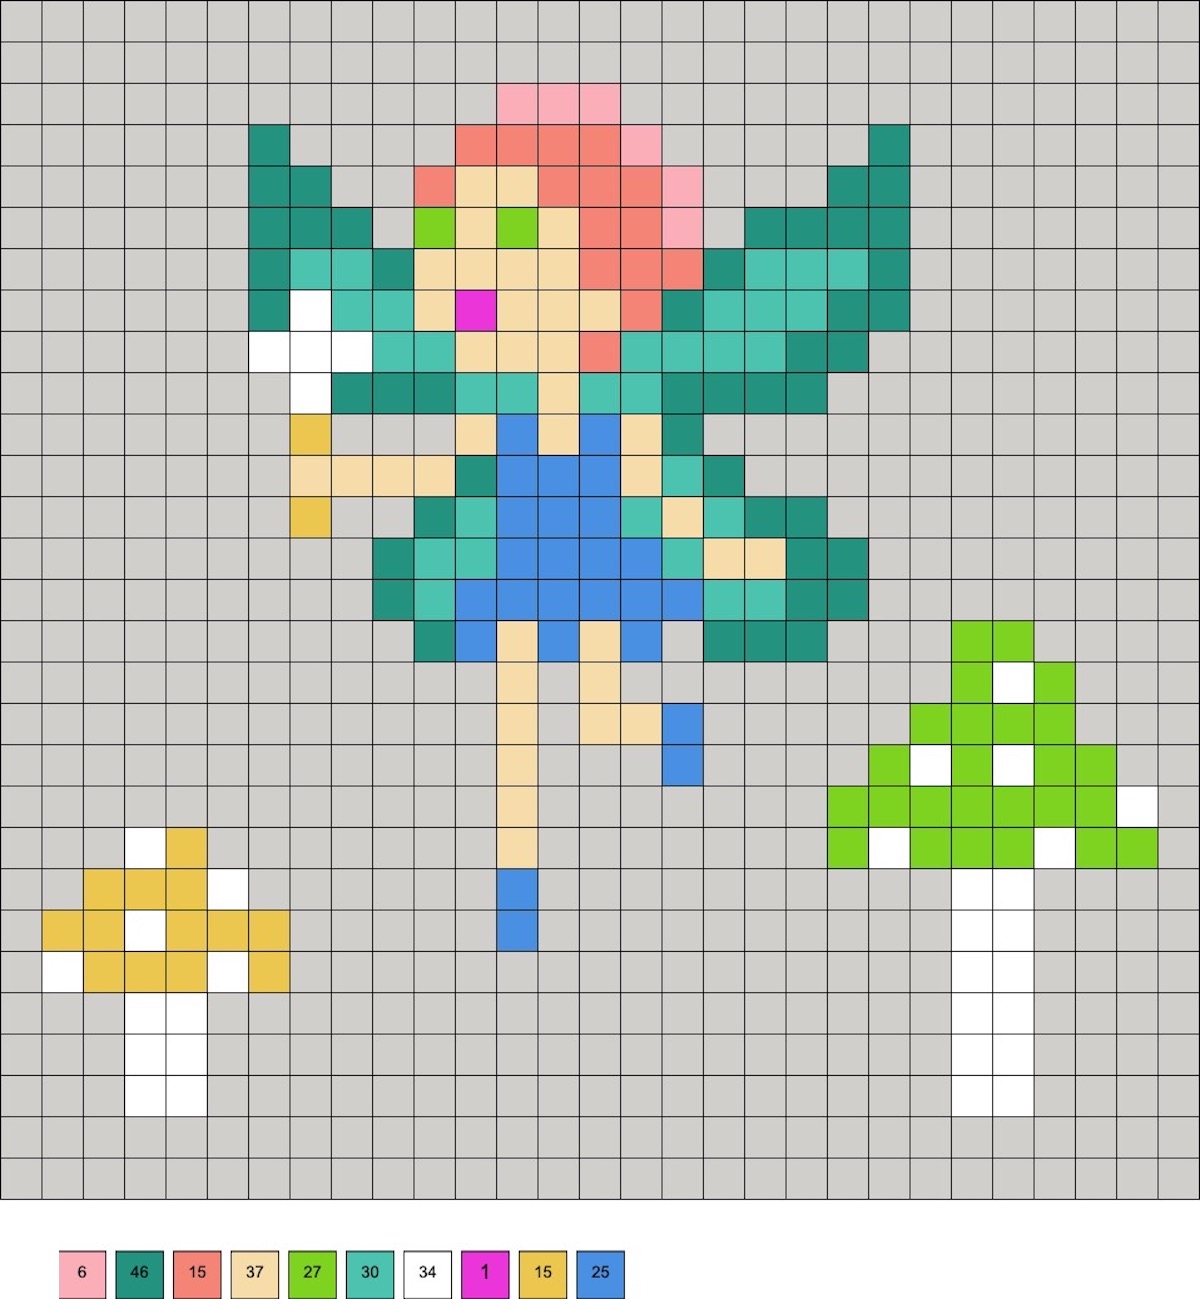
Flying Fairy with Two Mushrooms
These patterns use 6 pink, 46 parrot green, 15 hot coral, 37 pastel yellow, 27 kiwi green, 30 sky, 34 white, 1 fuschia, 15 butterscotch, and 25 blue beads.
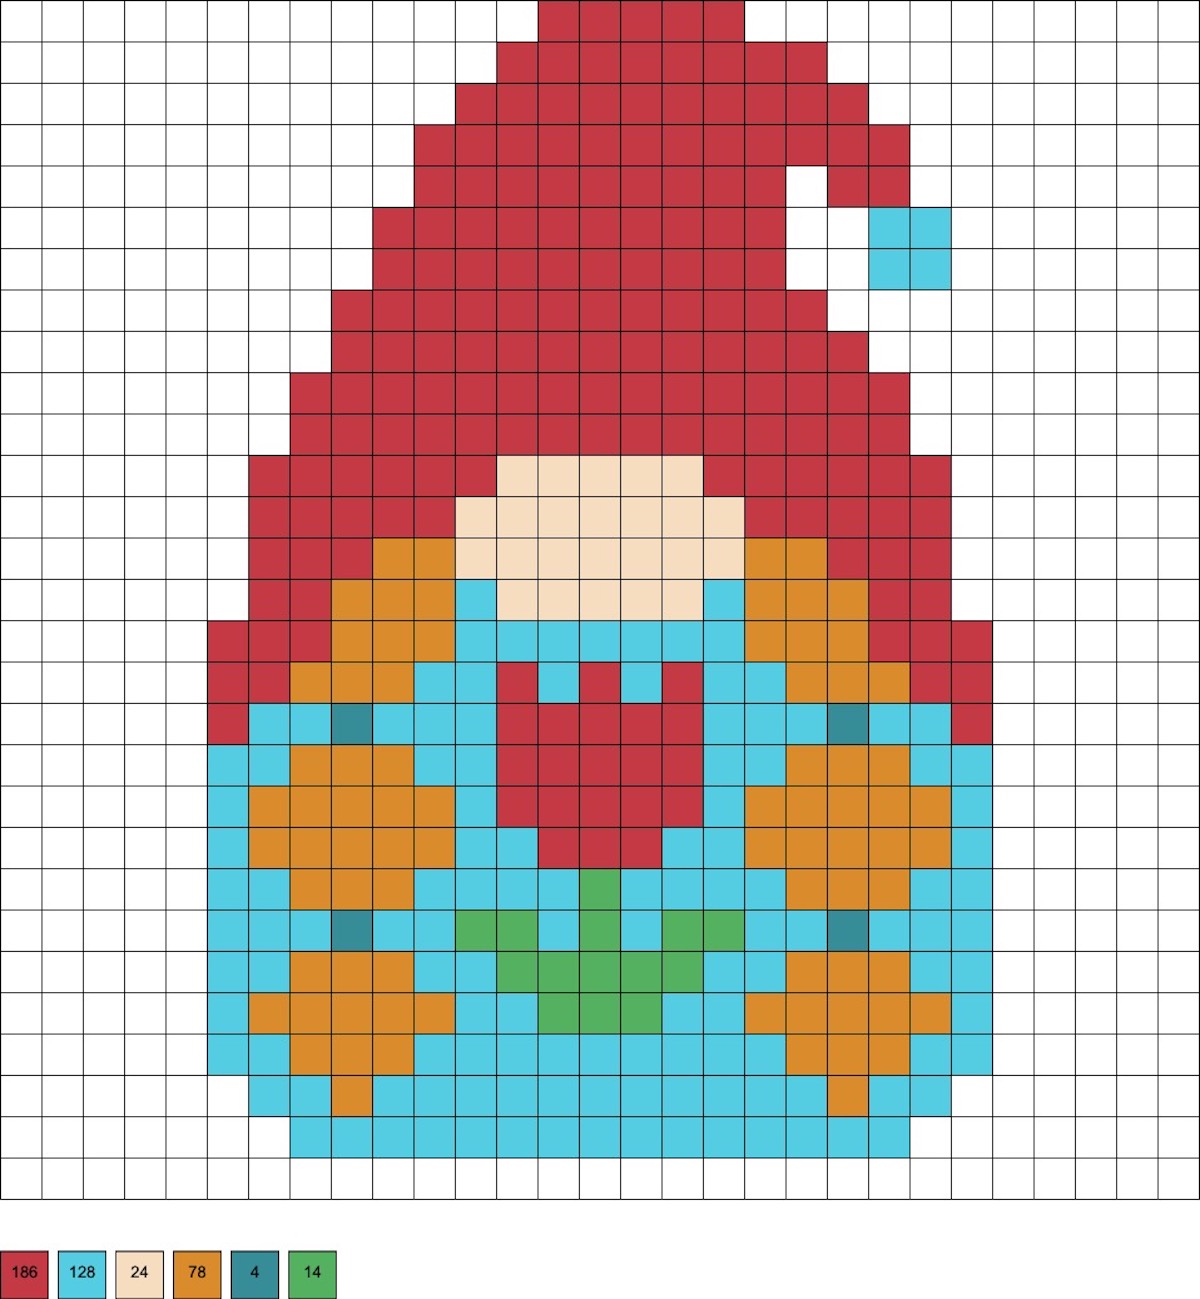
Female Gnome with Braids
This pattern uses 186 red, 128 sky, 24 flesh, 78 honey, 4 teal, and 14 bright green beads.
Long Black and Short Black Haired Fairies
Gnome on a Tree Stump
This pattern uses 23 blue, 20 light green, 23 parrot green, 37 white, 17 sky, 16 black, 19 flesh, 3 magenta, 41 brown, 10 kiwi green, and 20 dark brown beads.

Fairies on Round Pegboards
You have one long haired and one short haired fairy to easily customize the costume, skin, and hair colors.

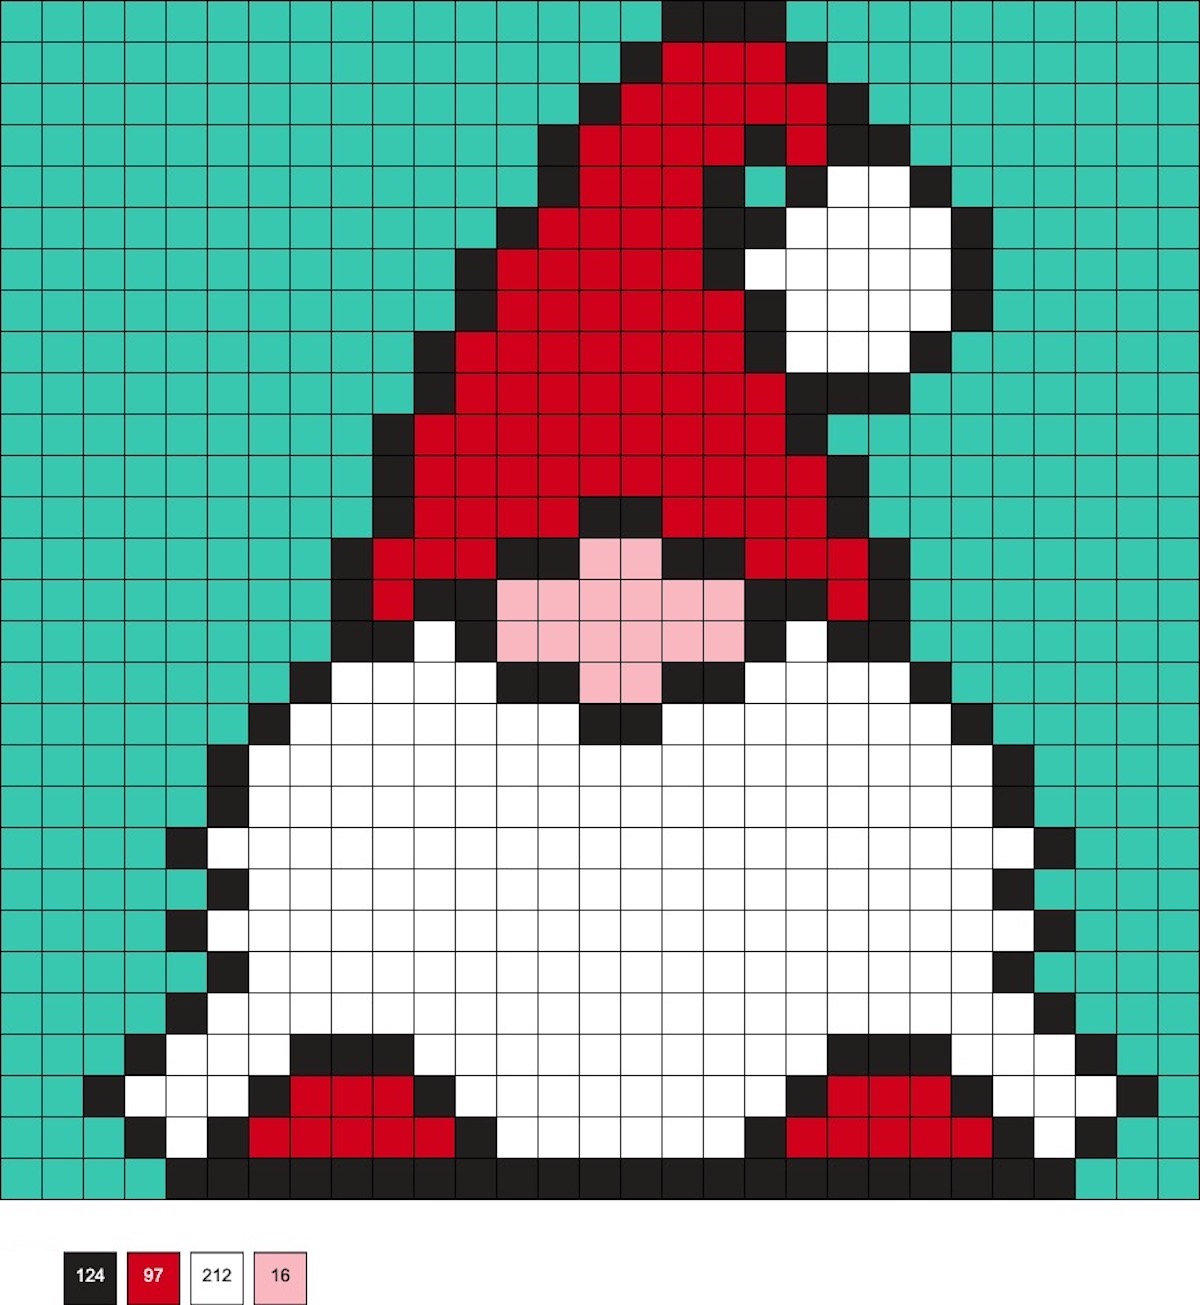
Gnome with a Huge Beard
This pattern uses 124 black, 97 red, 212 white, and 16 flesh beads.
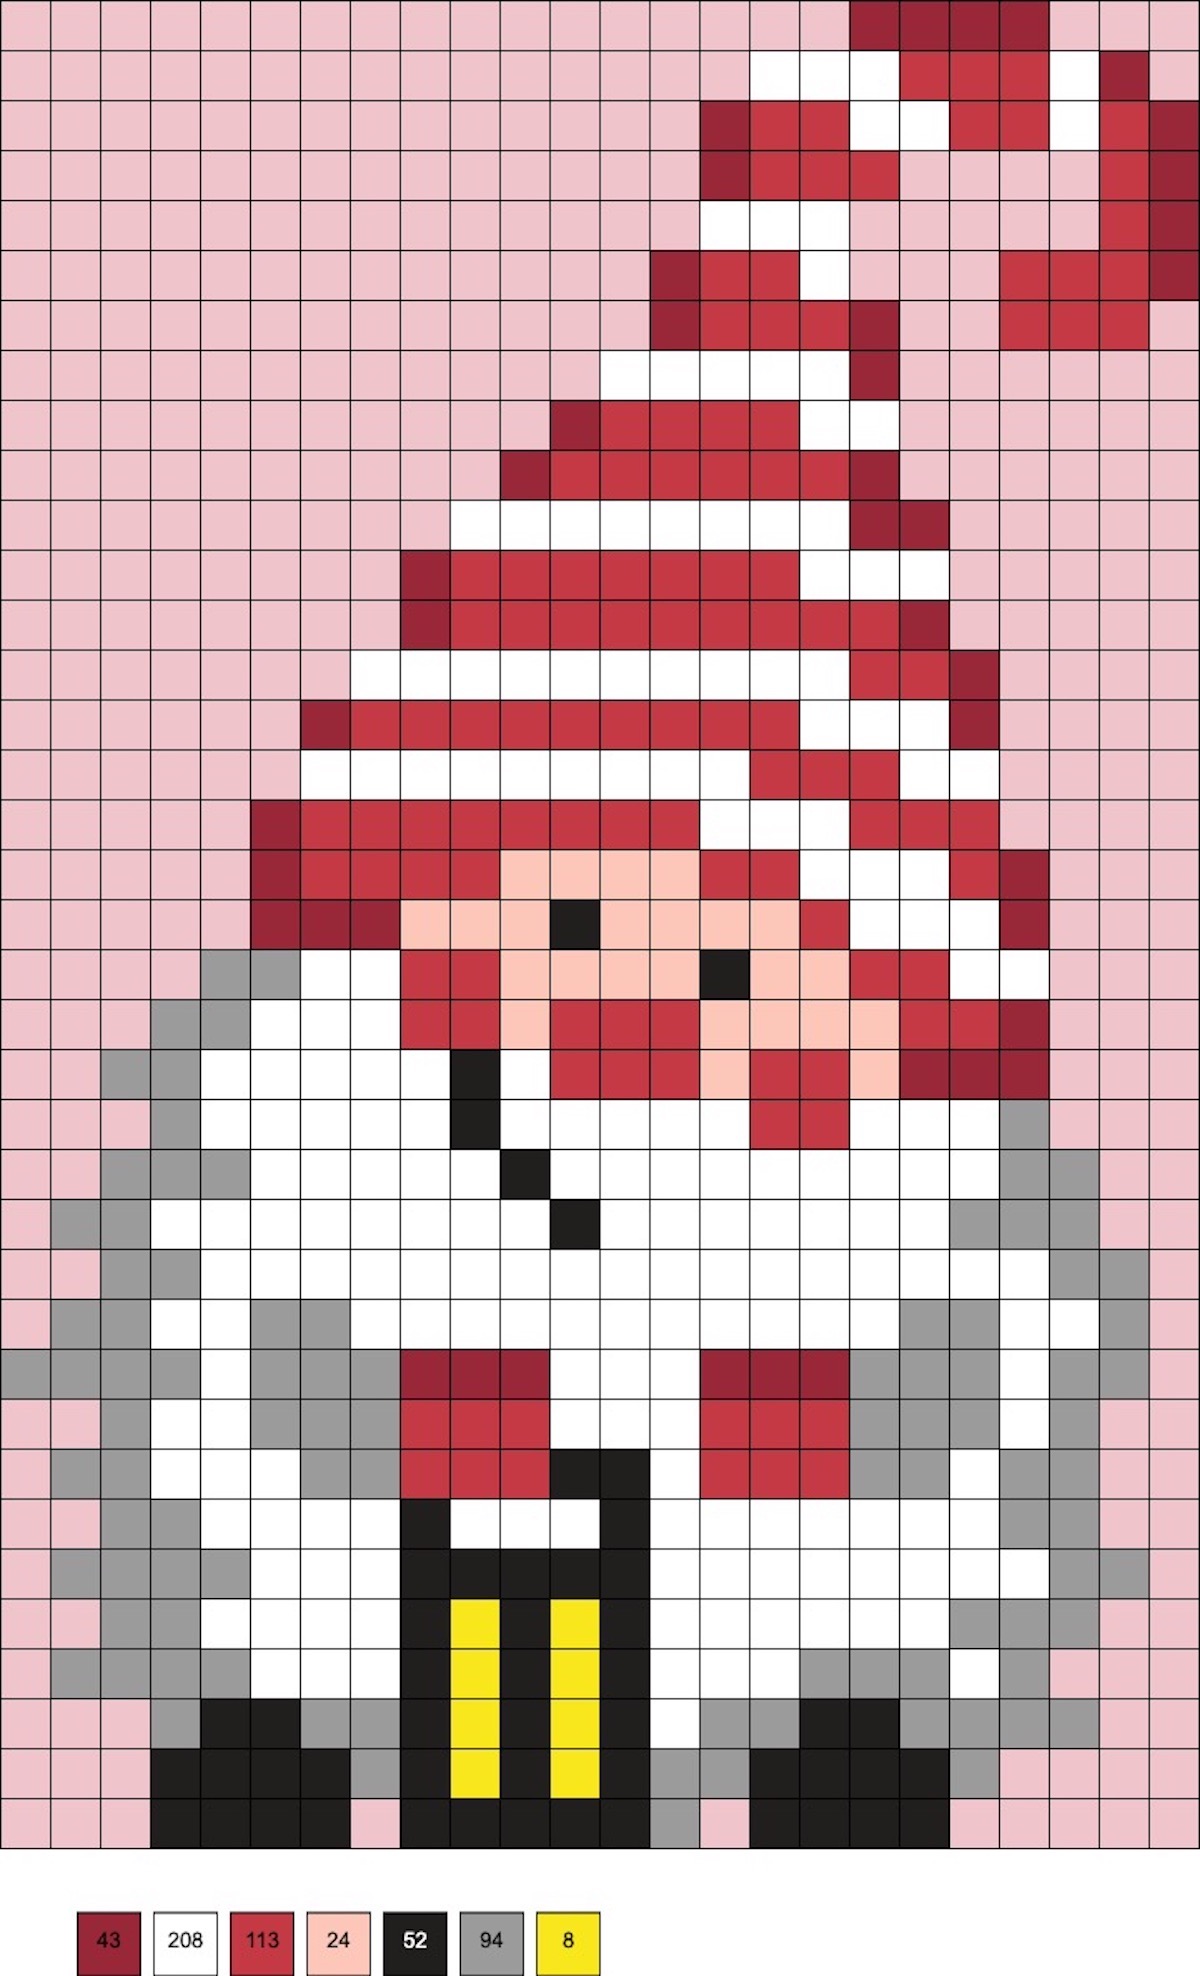
Striped Hat Gnome with a Lantern
This pattern uses 43 cherry, 208 white, 113 red, 24 flesh, 52 black, 94 gray, and 8 yellow beads.
If you’re ready to make some fairies and gnome perler beads, let me know in the comments! I’d also love for you to check out these additional ideas:
- Care Bear Perler Beads (20+ Free Patterns!)
- Cat Perler Beads (Over 50 Free Patterns!)
- Gnome Bookends in the Cutest Woodland Theme
- Hello Kitty Perler Beads (15+ Free Patterns!)
- DIY Gnome Ornaments For an Adorable Christmas
- Perler Bead Bookmarks Are a Cute Kids Craft
- Perler Bead Box to Hold Your Treasures
The post Fairy & Gnome Perler Beads (25+ Patterns!) appeared first on DIY Candy.